|
5560 ATX PSU Mod
Introduction
Planar Power Supply Connectors Pinout
Jump-starting the Power Supply
Power Supply Overview
Planar Power Connectors
Disk Drive Power Connector
Removing Power Supply
Opening Power Supply
Power Supply Inside
Power Supply Fuse
Power Supply Fan
Reliability
Content created by Tomáš Slavotínek.
Introduction
The power supply is rated for input voltages within the 100-240 V AC range.
The AC input is converted to DC outputs that supply the system with proper
operating voltages.
The presence of the "Power Good" signal turns on the green power-on light on
the front of the system indicating that the power supply is functioning
correctly.
The 5560 PSU has the same electrical specs as the
PS/2 Model 90 PSU but has a slightly modified
form-factor and different planar connectors.
Planar Power Supply Connectors Pinout

| |
Pin(s) |
Description |
Notes |
| - |
J23-6; J13-6 |
Key |
|
| |
J23-1; J13-2,3,4,5,7,8 |
Ground |
|
| |
J23-2,3,4,5,7,8 |
+5 V DC |
|
| |
J23-9,10 |
+12 V DC |
|
| |
J13-1 |
-12 V DC |
|
| |
J13-9 |
Power ON/OFF |
OFF: +5 V, ON: Shorted to GND |
| |
J13-10 |
Power Good |
+5V if all primary voltages are stabilized |
Jump-starting the Power Supply
Shut down the machine, unplug power cord from the PSU and open the case.
Then unplug power-supply cables from the planar and connect the power cord
back to the unit.
Short pins 8 and 9 on the power-supply connector J13 to start the unit.
The power-supply cooling fan must come up almost immediately - if you hear
just a tiny clicking noise from the unit and power-supply is probably defective
and has to be replaced.
If the built-in fan comes up, check voltages. If all of them are within the
given range the power-supply is functional, at least without load connected.
Power Supply Models
All known units were manufactured by Taiyo Yuden, Japan.
IBM P/N 79F0090
EC C72310 (older, fixed drive connector)
EC C81641 (later, short lead drive connector)
| Rail | Max. Current |
|---|
| +5 V | 28 A |
| +12 V | 5 A |
| -12 V | 0.35 A |
The rail ratings are the same as the older "REV B"
PS/2 Model 90 PSUs. (194 W total?)
Power Supply Overview
No voltage select switch on the back side - this is an auto-ranging unit.
Notice how the power supply shroud isn't quite as tall as the backplate
portion of it, there's just a small bulge to make space for the 92 mm fan. This
modification was necessary to make space for the SIMM modules that are now
installed directly on the planar (IBM Japan didn't use the angled SIMM sockets
that can be seen in many other PS/2 systems, including the Model 95).
For some reason the power supply still has a provision for the memory riser
support bracket.
The drive power cabling is modular - there is only one male molex connector
on the power supply, to which the drive power harness (normally with 3+1 female
connectors) plugs in.
Planar Power Connectors
A pair of "3.96mm Pitch KK Crimp Housing, Female, Friction Ramp, 10 Circuits (1 key), Natural" connectors.
Original part: Molex 5239 series connectors - obsolete.
Replacement: Molex 41695 series 09508101.
Use with: 5168 Cat Ear Crimp Terminals for 22-28 AWG, 5167 Cat Ear Crimp Terminals for 18-24 AWG, 2478 Crimp Terminal, 2578 Crimp Terminal - obsolete.
Replacement: 08-50-0189 (CONN 18-20AWG CRIMP TIN), 08-50-0134 (22-26AWG)
Polarizing key peg: Molex 42324
Mates with: Vertical PCB Header 5271, 5273
Disk Drive Power Connector
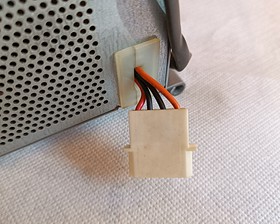
The 5560 PSU has only one molex connector (male) to which the disk drive
power harness plugs.
On most PSUs (EC C72310) the connector is affixed to the unit, similar to
the PS/2 Model 95 PSU.
Later units (EC C81641) have the connector attached to a short cable, like
on the older "REV B" PS/2 Model 90 PSUs.
The disk drive power harness has four female connectors — three for
disk drives (labeled "B", "C", and "D") and one for the power supply (labeled
"PS"). The harness is P/N 79F1142.
Removing Power Supply
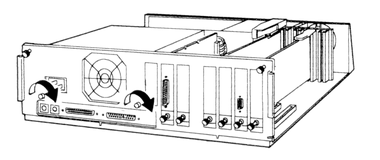
Remove the power lead and undo the two smaller thumb screws on the back of
the system unit (the screws are captive, don't try to remove them completely).
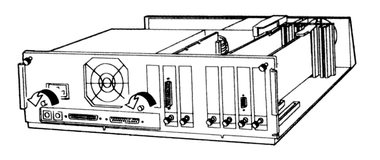
Pull the blue PSU release tab towards the front of the system unit and swing
the power supply out, away from the planar and the adapter cards.
Note: Long CD-ROM drives can prevent you from
sliding the PSU forward. If you have such a drive installed in Bay B, you will
have to unlatch it and move it forward a bit to make space for the PSU and the
cabling.
Photos: tab, matching stud,
latched, unlatched
If you intend to completely remove the power supply from the machine you
must also remove the following items:
- the grounding strap that connects the PSU case to the DASD frame
- the two planar connectors
- the disk drive power harness
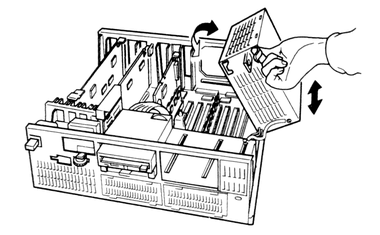
Now you can access the planar, SIMM slots, and drive cabling.
To completely remove the power supply you must first swing it out of the
machine (make sure the planar connectors aren't trapped between the PSU and the
base of the chassis). Then slide it towards the back to release it from the
hinges.
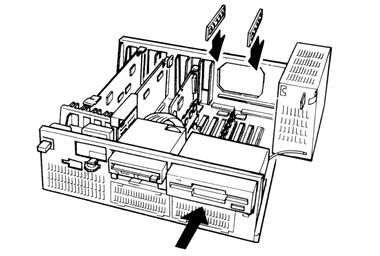
When you are done just swing the power supply back in, push it towards the
back so it sits flush with the back plate, and finally tighten the two smaller
thumb screws.
Opening Power Supply
You need a T-10 security Torx to open the PSU.
PSU Side - Planar Power Cables
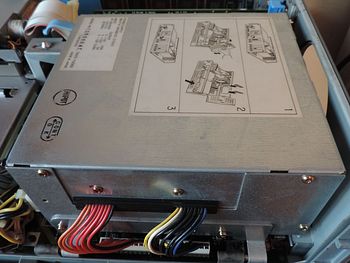
There are 7 Torx screws on the connector side of the PSU but to open it you
only have to undo 3 of them - two near the top edge and one in the bottom back
corner. Ignore the two screws right above the planar power cables (one marked
red) and the two that are holding the hinge bracket.
PSU Bottom & Side Towards Complex
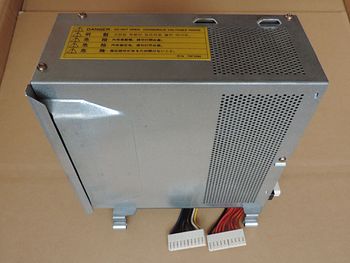
There are 3 more Torx screw on the other side of the PSU (towards the
complex) - undo all 3.
And finally there's one Torx screw at the bottom side, near the front edge
- undo it as well.
To remove the bottom cover you have to first separate the two halves along
the front edge, slide the bottom cover forward and then lift it away from the
unit once it clears the bottom back lip.
The internal components are mounted upside down in the top part of the
cover.
Power Supply Inside
Power Supply Fuse
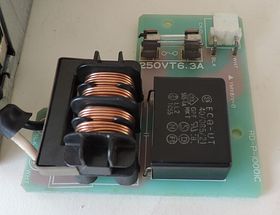
F101 is T6.3A / 250V, "T" stands for Time.
Power Supply Fan
Mitsubishi
MMF-09B12DM
12VDC 0.16A
Mitsubishi Electric
Reliability
Major Tom said:
I have a bad experience with the 5560 power supplies. All three
units I encountered failed as soon as they were plugged in. One sample worked
fine before it was shipped from Japan. Perhaps this is a design flaw in
combination with component aging that causes the PSU to fail if plugged into
230 V mains? Japan uses 100 V line voltage, but the PSU is rated for 100-240 V
AC (auto-ranging).
The failure mode differed between the units — further investigation
needed.
See HERE for a workaround.
|