|
Your system has a special type of memory that maintains an inventory
of its features and their associated settings. This inventory is
called the configuration information. The memory is kept active by
a battery, so the configuration information is not lost when the system
is turned off. The battery-backed memory maintains information about:
o Adapters
o Diskette drives
o Memory
o Parallel ports
o SCSI devices
o Serial ports
o Time and date
Subtopics:
Configuration Settings
Configuration Errors
Working with the
Configuration Information
Starting
the Set Configuration Program
Viewing
the Configuration
Changing
the Configuration
Bypassing
the System Programs
Backing
Up the Configuration
Restoring
the Configuration
Running
Automatic Configuration
Setting and
Viewing SCSI Device Configuration
Removing
a SCSI Device
Enabling
the Presence Error Reporting Feature
Disabling
the Presence Error Reporting Feature
Displaying
the Memory Map
Recording
Changes
Configuration
Settings
Most built-in features and optional adapters have programmable
settings, such as the serial-port and parallel-port assignments.
Each time you turn on the system, the settings are copied from memory to
various features to get them ready for operation. You can change
these settings through the system programs.
Configuration information must be added or changed when
optional features are installed. Some options come with an Option
Diskette. This diskette contains configuration and diagnostic files.
As part of the option-installation procedure, you copy these files to the
System Partition, a protected area of your hard disk (non-array models
only) or to the backup copy of the Reference Diskette. When you turn on
the system, it senses that a new option is installed, displays a configuration
error, and asks if you would like to automatically configure the system.
If you respond by pressing Y, the system uses the information from the
configuration files to assign settings for the new option that do not conflict
with settings for other installed features. This eliminates the need
for you to analyze operating parameters such as interrupt levels and DMA
assignments.
Occasionally, the system might not be able to assign a
nonconflicting setting for a new option. When this happens, the system
lets you know that a conflict exists, and that you need to change the setting
of another option to resolve the conflict. The system programs allow you
to change the settings through the Set Configuration program.
Configuration
Errors
Each time you turn on the system, the power-on self-test (POST) compares
the stored configuration information with the installed hardware.
A configuration error can occur under any of the following conditions:
o Adapter or device was added, removed, or moved to different location.
o An external device is not turned on.
o A device is not working correctly, and POST cannot detect its presence.
o Two devices are assigned the same settings (configuration conflict).
If a configuration error is found, an error message, similar to the
following, appears on the screen.
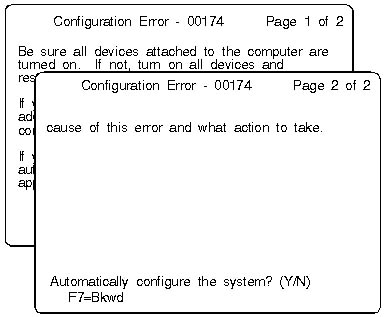
For non-array models, if you just added, removed, or changed
the location of an option, pressing Y updates the configuration information
stored in memory. If you press N, the system programs Main Menu appears
so you can test the system, look at the configuration information to determine
the cause of a problem, or change the configuration information to correct
a conflict.
For disk-array models, you will need to insert the Reference
Diskette to update or change the configuration information or to test the
system.
If the configuration error is caused by a SCSI device
not turned on, not connected, or failing, you are not given the choice
to run automatic configuration. You must press Enter to bypass the
error and continue to the Main Menu, where you can either test the
system or check the SCSI device settings. See Setting and Viewing
SCSI Device Configuration for more information.
Working
with the Configuration Information
The system programs contain the Set Configuration program, which allows
you to work with the configuration information. This program allows
you to perform the following tasks:
o View configuration
o Change configuration
o Back up configuration
o Restore configuration
o Run automatic configuration
o Set and view SCSI device configuration
o Display memory map
You can get online help for each task by pressing F1.
Subtopics:
o Starting the Set Configuration
Program
o Viewing the Configuration
o Changing the Configuration
o Bypassing the System Programs
o Backing Up the Configuration
o Restoring the Configuration
o Running Automatic Configuration
Starting
the Set Configuration Program
To start the Set Configuration Program:
1. Start the system programs.
2. Select Set configuration from the Main Menu.
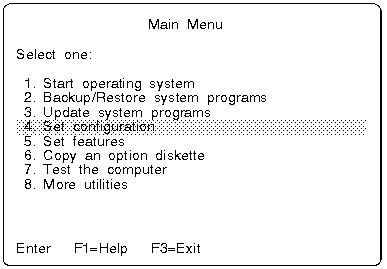
3. Use the Up Arrow key or the Down Arrow key to highlight the
choice; then press Enter.
Viewing
the Configuration
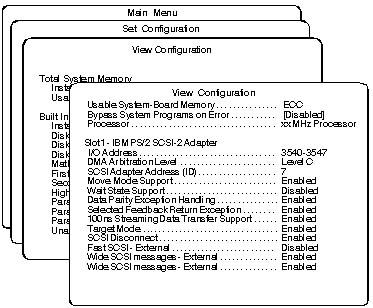
By selecting View configuration from the Set Configuration menu, you
can see a list of the installed features and their associated settings.
You can get help about any one of the settings by highlighting it and then
pressing the F1 key. The active keys are shown at the bottom of the
screen. (Press F8 to advance to the next screen.) You cannot
make changes from the View Configuration screen.
Changing
the Configuration
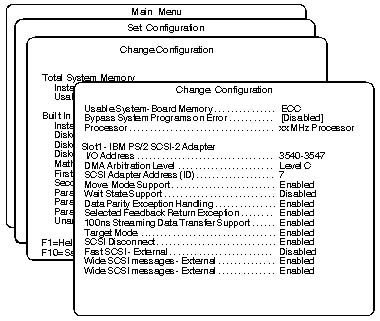
By selecting Change configuration from the Set Configuration
menu, you can change one or more settings. Some settings are set by the
system and cannot be overridden. You can change only those settings enclosed
in brackets ([...]) and which have not been set by the system. This screen
is the same as View Configuration, except for the active keys shown at
the bottom. (Press F8 to advance to the next screen.)
Normally, you don't have to change any of the configuration
settings because the Automatic Configuration program handles this for you.
Some of the settings deal with the technologies used for each device, and
you should be familiar with them before
changing the settings.
To change a setting, use the Up Arrow key or the Down Arrow key to highlight
one of the bracketed items; then use the F5 and F6 keys to scroll through
the list of available choices. When you are finished making changes,
press F10 to save them. If any setting conflicts with another, an
asterisk appears next to the conflicting setting. You must change one of
the conflicting settings to a nonconflicting value.
Bypassing
the System Programs
You also can change the way your system handles POST errors.
If you don't want the system programs to load when an error occurs during
POST, highlight Bypass System Programs on Error and change the Disabled
setting to Enabled using the F5 or F6 key.
Backing
Up the Configuration
Selecting Backup configuration from the Set Configuration menu copies
the configuration information to a file in the System Partition.
Restoring
the Configuration
Selecting Restore configuration restores the configuration information
from the System Partition to the battery-backed memory. This is useful
in case the battery fails or a change you made to the configuration information
causes a problem and you need to change it back to the way it was. You
can use this feature only if you have previously backed up the configuration.
Running
Automatic Configuration
Selecting Run automatic configuration from the Set Configuration
menu resets the configuration information for all installed features to
their default settings. The Automatic Configuration program sets
system-board features first, then sets adapters, one at a time, starting
with the lowest numbered slot.
Notes:
1. This program might change the setting of an adapter and cause
a memory-address conflict with some application programs and DOS memory
managers. Before using this program, record the current settings
on the View Configuration screen, or if you have a printer attached, press
the Print Screen key to print a copy of the View Configuration screen.
2. This program might change the values set by the ServerGuide
Performance Tuning utility. If the values were changed, rerun the
tuning utility.
Setting
and Viewing SCSI Device Configuration
If you need to know what IDs are being used, or what types of SCSI
devices are installed, you can see this information by using the system
programs:
Note: For disk-array models,
you can change RAID configuration settings only from the RAID configuration
program.
1. Turn on system. When F1 prompt appears, press F1.
System programs Main Menu appears.
Note:
For disk-array models, insert Reference Diskette into primary diskette
drive, then turn on system. Or, if system is turned on already, insert
Reference Diskette and press Ctrl+Alt+Del.
2. Select Set configuration from the Main Menu.
3. Select Set and view SCSI device configuration.

You can change only those settings enclosed by brackets
([...]) and which have not been automatically set by the system.
To get help information about any setting, use the Up Arrow or Down Arrow
to highlight your selection; then press F1.
You can change the SCSI adapter ID; however, other SCSI
device IDs are set by the system and cannot be changed from this screen.
Most SCSI devices, except adapters and built-in controllers, use jumpers
or switches to set the ID. The SCSI IDs for hard disk drives installed
in Banks C, D, and E are automatically set by the controller. You can change
the ID of a SCSI adapter from the Change Configuration screen or for disk-array
models, you can change RAID configuration settings from the RAID Configuration
program.
Subtopics:
o Removing a SCSI Device
Removing
a SCSI Device
To remove an individual SCSI device permanently:
1. Turn off the server.
2. Remove the device.
Note:
For disk-array models, insert the Reference Diskette now.
3. Turn on the server.
4. When error appears, press Enter to bypass error and get to
Main Menu.
5. Select Set configuration from the Main Menu.
6. Select Set and view SCSI device configuration from the Set
Configuration Menu.
7. Locate the Not present line for the SCSI device you want to
remove.
8. Highlight the Keep setting; then press F5 or F6 to change
it to Remove.
9. Press F10 to save the changed setting.
Enabling
the Presence Error Reporting Feature
SCSI devices have a presence error reporting feature that can be set
through the Set and View SCSI Device Configuration screen. This feature
works as follows:
o When presence error reporting is set to enabled on a device, POST
reports a configuration error if the device is disconnected or turned off.
o When presence error reporting is set to disabled on a device, POST
does not check to see if the device is attached or turned on.
You also have the option of setting presence error reporting
on all SCSI devices to disabled. For more information about presence error
reporting, see Setting and Viewing SCSI Device Configuration.
Disabling
the Presence Error Reporting Feature
If you want to disable presence error reporting on all SCSI devices
in your system:
1. Start the system programs.
2. Select Set configuration from the Main Menu.
3. Select Set and view SCSI device configuration from the Set
Configuration Menu.
4. Locate the SCSI Configuration Verification line.
5. Highlight the Enabled setting; then press F5 or F6 to change
it to Disabled.
6. Press F10 to save the changed setting.
Whether you have disabled presence error reporting of an individual
SCSI device or all SCSI devices in your system, the concept is the same.
In disabled mode, POST does not check to see if the disabled device is
attached or turned on. The configuration information for this device,
including SCSI ID, is kept active in the battery-backed memory. This
feature is convenient if you temporarily disconnect a device, share a device
among systems, or use the device occasionally and want the ability to leave
it turned off without getting an error message each time you turn on the
system.
Subtopics:
o Displaying the Memory Map
o Recording Changes
Displaying
the Memory Map
Selecting Display memory map from the Set Configuration menu allows
you to view an area of memory normally used as a workspace for adapters.
The memory map identifies each device using this space by name and slot
number, and shows the addresses being used by that device. It also
shows the amount of unused memory and the addresses available for other
purposes, such as memory-manager device drivers.
Recording
Changes
Whenever you make changes to the configuration, it's a good practice
to record the changes, or print the information that shows the changes.
If you have a printer attached, you can print the information from most
screens by pressing the Print Screen key. Server Records provides space
to keep records. Should the configuration information get lost or changed
by accident, your records will help you recover quickly.
|