|
Power Management
AC Adapter (60W)
Test the A/C Adapter
Battery Pack
Test the Battery Pack
Test the Backup Battery
Power Management
Suspend/Resume: An application is
suspended by closing the clamshell leaving the power switch on. When
the clamshell is opened, the application resumes at the point it was suspended.
During suspension, system components are automatically powered off except
for the real time clock and application memory.
Changing the rechargeable battery pack
will not disrupt the application, since IBM PS/2 NiMH Battery Pack II consists
of two batteries, replace one at a time.
AC Adapter (60W) includes an internal
(3 hour) quick charger that recharges the IBM PS/2 NiMH Battery Pack II
automatically while the system is connected to an AC-power source.
Sleep mode. Sleep mode conserves battery
power during idle times between clock cycles and key strokes by putting
system components in an idle state resulting in low power usage.
Application, operational, operating system and environmental characteristics
will affect actual battery duration between recharges.
IBM PS/2 AC Adapter (60W) P/N 06G8451
The IBM PS/2 AC Adapter (60W) includes an internal (3
hour) quick charger that recharges the IBM PS/2 NiMH Battery Pack II automatically
while the system is connected to an AC-power source.
>>Anyone out there know where I can find an AC adapter for a CL57sx?
Or, does anyone know if any of IBM's other laptops used the same AC adapter?
FAIK the CL57SX uses a unique AC-Adapter which hasn't been
used anywhere else. Don't forget that the CL57 is a PS/55 machine originally
- designed and built for domestic Japanese market only.
The DC input plug looks like this:
  /--------------\
 /  HHH   HHH     \ = GND   -  CC
 |                |
 |     HHH   HHH  | = Minus -  Plus
 | |||            | = Key
 +----------------+
CC = 17.5VDC 1.2A
Plus = 20.0VDC 3.0A
The plug requires some creativity...
GND is "protective GND" - means there is a zero Ohms resistance
between this pin and the third pin on the power supply. "Minus" is the
DC GND return for "Plus" and "CC" (Battery Charger Voltage).
"Key" is a hole in the plug, into which a plastic pin goes to avoid
accidentally plugging it upside down (which is more than unlikely due
to the form of the plug already ...)
Test the A/C Adapter
If the Power-On indicator is not on, check the power cord of
the AC adapter for proper installation and continuity.
- If any noise can be heard from the AC adapter when it is plugged
into line voltage, replace the AC adapter with a new one.
If no noise can be heard from the adapter, go to Step 3.
- If the noise still comes from the new AC adapter, suspect the computer.
Replace the AC adapter with the original one, then go to the next step.
If no noise comes from the new adapter, the original adapter has the problem.
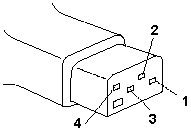
- Unplug the AC adapter cable from the computer and measure the output
voltages at the plug of the AC adapter cable. Connect the minus lead of
the volt-ohm meter to pin 3 during the measurement.
|

|
Pin Vdc
1 +18 to +22
2 +17 to +21
3 GND
4 Communication GND
|
If the voltages are not correct:
- Unplug the AC adapter from the outlet and leave it for a few minutes.
- Plug the AC adapter into the ac outlet.
- Measure the output voltages of the AC adapter.
- If the voltages are still not correct, replace the AC adapter.
If the voltages are OK:
Plug the cable into the computer and try the failing operation again.
If the problem still remains, replace the voltage converter.
If the problem disappeared, suspect the installation and continuity
of the AC adapter cable.
IBM PS/2 NiMH Battery Pack II
P/N 07G1418 FRU 07G1413, 12V, 1.4 Ah
IBM PS/2 External Rechargeable Power Pack II
P/N 34G9851
Peter says:
Batteries: in an act of sheer violence I broke one apart.
Not too difficult. Cut with a sharp knife at the top about 1.5 mm deep
and around the top cover. You see the slight outline when looking closer.
It is the part where the black and yellow decal is sticking upon.
Then gently use a flat chisel (or a sharp small screwdriver)
to get it open at one corner without totally breaking it. Make sure you
don't damage the sides, front and rear - you will need that afterwards.
The top cover is glued sparsely along the outline but also with a 3 x 3
cm pad of double glue tape (carpet tape) onto the cells. Hrrmmm.
Inside are
- 10 NiMh cells, 1.2V each, 16mm diameter / 43mm lenght (4/5A IIRC)
- the thermal sensor (NTC + diode + resistor in a shrink rubber tube)
- the overtemp switch (KLIXON 4MM75A) between cells 4 and 5
- an insulation piece of cardboard (slightly formed)
- some wires
The cells are industrial standard with sheetmetal contacts.
These are nickel-plated and hard to solder. They are usually point-welded,
but soldering works as well if you roughen the surfaces with a piece of
sandpaper. Cells are similar to NH GP 181AFH-1Z (1.810 mAh / 1.2V / 4/5A),
which cost about 5.75 Euro per one at Reichelt in Germany - according to
an old 2004-catalogue. You could take the NH GP 121AAM-1Z as well (for
2.50 Euro), but these offer 1.100 mAh only and are a tad thinner in diameter.
Individual mileage may vary and I think they came cheaper and with various
sources to pick from.
Have taken pictures from the crap-out. Maybe I'll buy 10
cells to revive at least one battery, but before I need to solve the keyboard
problem. Should be possible. I'd even found a solution with that silly
DS1287 ...
8554 on Gel Cells
Sam Blinkhorn
Hi Gary, I did the same thing on my son's TP755c, gutted the
dead battery pack, which was WAY too expensive to repack, then soldered
a couple of wires to the inside of the empty pack with spade connectors
on them.
Connected up to a 7ah 12v gel battery, and powered on with some
trepidation, I must admit..... presto ! worked like a charm. Now
he can use it when we have a (frequent) power outage.
BTW the gel cell cost $25 with an included plugpack charger/regulator,
the replacement NiHi batteries would have cost over $150 ! Admittedly a
neater solution, just way too dear.
Al Savage
You want to be careful using that method. The inverter
that is powered from those batteries is expecting *very clean* power.
If you run a line-powered DC supply there, be sure an include a decent
sized battery to act as a filter, even if the battery is not mounted in
the unit anymore. Don't run it on an AC->DC supply alone.
Smokey Behr
Another possibility is to use a couple of monster size
capacitors, you know, the ones about the size of beer cans. They're cheap
and plentiful at electronics surplus stores, or you could shell out the
big bucks and go to a car audio store that caters to the "Bump N Thump"
crowd.
Test the Battery Pack
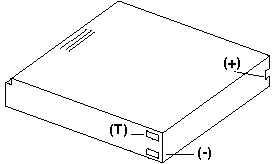
First, remove each battery
and measure the voltage between (+) and (-).

Terminal (V dc)
(+) +12 to +18
( T ) Thermal Detection
( - ) Ground
If < +12v, the pack is discharged or defective.
If > +12v, go to the next step.
2. Using a low-power ohm meter, measure the resistance between (T) and
(-). The resistance must be 500 ohms to 20 kilohms. If the resistance is
out of range, replace the battery pack.
Test the Backup
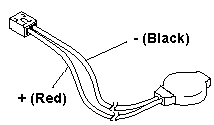
Battery 35G2282
1. Remove the keyboard and the top cover.
2. Disconnect the battery connector from the system board.
3. Measure the voltage of the backup battery.

Wire Vdc
Red +2.5 to +3.7
Black Ground
If voltage is correct, replace system board. If not, the
battery was shorted out or is defective.
|