|
Content by Fred Spencer and Al Savage
(original HERE).
Edited by Major Tom.
Introduction
Various PS/2 models have used many different part numbers, sizes,
interfaces, and internal electricals. All of the drives used in the 8580 series
are very different from the generic drives as they all obtain their power from
the interface and have no separate power connector. They are all 1.44 MB
models, as the 2.88 MB models were released for later PS/2 systems and should
not be used on the 8580.
Major Variations
The 8580 used two different interfaces! The 25 MHz 8580-Axx models used the
newer pin-style interface and the older models all use the card-edge style. The
drives are usually identifiable from the front by the size of the eject button.
The pin-style drives have a thin blue eject button, and the card-edge style
drives have the much larger eject button, similar to the size of the one used
on the older 720 KB drives. However, this is not absolute as there is a
card-edge drive with the thin eject button which was used with the 8570 and
other exceptions probably exist! I have been successful in using the pin-style
drives (with their appropriate drive cage) with a 20 MHz planar, but I have
also been advised that there are electrical differences which could damage the
planar. So, you will probably be taking a risk in trying this.
Card-Edge Style Drives
The original card-edge style diskette drive is identified by the P/N 90X6766
and is also sometimes accompanied by the FRU # 72X8523, which is also the FRU #
reported in the HMM (October 1994). I have seen these drives labeled as
manufactured by Mitsubishi, Alps Electric and SONY. There are physical
differences between these drives and most parts are not interchangeable, but
the entire drives seem to be fully compatible at the interface level.
34-pin Style Drives
These pin style diskette drives can be sub-divided into two sub-groups. The
original model 8580 drives are identified by the P/N 90X6766. I have seen these
drives labeled as manufactured by Mitsubishi, Alps Electric and YE Data. Later
models were produced for the 8595 and they are identified by the P/N 72X6112 or
1619618 and also sometimes accompanied by the FRU # 64F0162, which is also the
FRU # reported in the HMM (October 1994) for both the 8580 and the 8595.
HOWEVER, I have discovered that although the 8595 drives (FRU #64F0162) will
work on the 8580, the 8580 drives (P/N 90X6766) will NOT work on the 8595!!
The drives with FRU # 64F0162 have also been labeled as manufactured by
Mitsubishi, Alps Electric and YE Data.
FDD Controller Failure?
The diskette controller chip is located directly under the main power supply
fan and tends to accumulate dirt which can lead to current leakage between
various pins and eventually apparent failure of the diskette drive. Diskette
drive errors are indicated by a POST error code of 6xx. If you are having
strange errors, you might want to use a can of compressed air to blow the crud
from the top portions of the planar (motherboard).
Repairs
As long as replacement diskette drives are available on the used market at
very low prices, it is not probably not worthwhile to attempt to repair these
drives. However, it has been reported that some failures have been caused by
the dislocation of a foam pad from the top drive head. I checked some of my
drives, and I found this design exists in about half of my card-edge diskette
drives. So if you have a problem drive, you may wish to investigate this
possibility, as the fix is reportedly to either re-attach the foam pad with
some glue or remove the foam pad. An very information response from Peter Wendt
on this subject in comp.sys.ibm.ps2.hardware follows:
"Hi Josh !
Ok, I didn't want to, but it seemed the quickest way. I pulled the floppy
(known to be good) out of my Reply Mod80 and put it in the troubled one. The
floppy worked, QBMCA worked and the config was able to set the system up. When
I put the suspect floppy drive back in the system I get 162 on startup."
Fine - at least the "cross-checking" lead to the result that the error is
positively caused by the FDD. And that your machine suffers one of the rare
occurrences of a FDD 'reporting' an error. The 162 in this case is caused by
the fact that the FDD does not respond properly at the power on self test
(POST).
This is in most cases a result of:
- a sticking R/W head (head guides silicon grease hardened or collected dirt)
- a blocked / dirty "Track 00 sensor" (at the rear, photocoupler)
- the head "cushion" went off and blocks the head movement (if you shake
the FDD you could probably hear something rattling inside)
If you have a set of very tiny "watchmaker" screwdrivers you could probably
open the drive. I often managed to get them working again. The inside cleaning
and greasing however is not trivial. Recommended grease for the R/W head guides
and the R/W head servo spindle is... "Tamiya ball gear grease" (!) - can be
obtained from the toys department of larger department shops ... no late
1st-of-April-joke.
Older ALPS FDDs (large button, LED above the disk slot) are known for
loosing the HD damper cushion, which is glued on top of the R/W heads assembly.
The glue hardenes, gets brittle and the thing goes off, blocking the movement
of the R/W-heads (particularly reaching the Track-0). You can either glue it
back in place ... or throw it away. (I never glued one back in place...)
During POST the R/W heads are driven out of Track-0, back in, out, in. This
must be finished in a definate amount of time - if the Track 0 isn't reached or
the movements are delayed (due to sticking head guides) the Error 162 is
displayed and the FDD is thrown out of the configuration.
Your FDD is damaged / not working anyway: why not trying to get it fixed
again? The chance is 50:50 - which is pretty fair. It is entertaining, trains
brain and fingers and you cannot loose much at all but gain some knowledge on
FDD-technology. I always encourage people to disassemble defective units in a
repair attempt. Even if it is not working afterwards: it cures curiosity and
helps understanding the "inside secrets" :-)
This for "common FDD service" - and completeness, as usual.
Very friendly greetings from Peter in Germany
Recapping 8580 Diskette Drives
With more of the electrolytic capacitors failing with age, it is possible to
repair many of the Mitsubishi drives if you are capable with a soldering iron.
This idea was pioneered by Al Savage of Washington State when he was active
within our newsgroup. I have had a better than seventy percent success rate
using Al's guidance. He prepared the following info in order to assist
those of us prepared to tackle this challenge.
(original HERE)
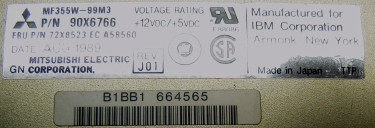
Drive parameters
P/N 90X6766, FRU P/N 72X8523, EC No. A58560, Date: Aug-89
Mitsubishi, Model: MF355W-99M3
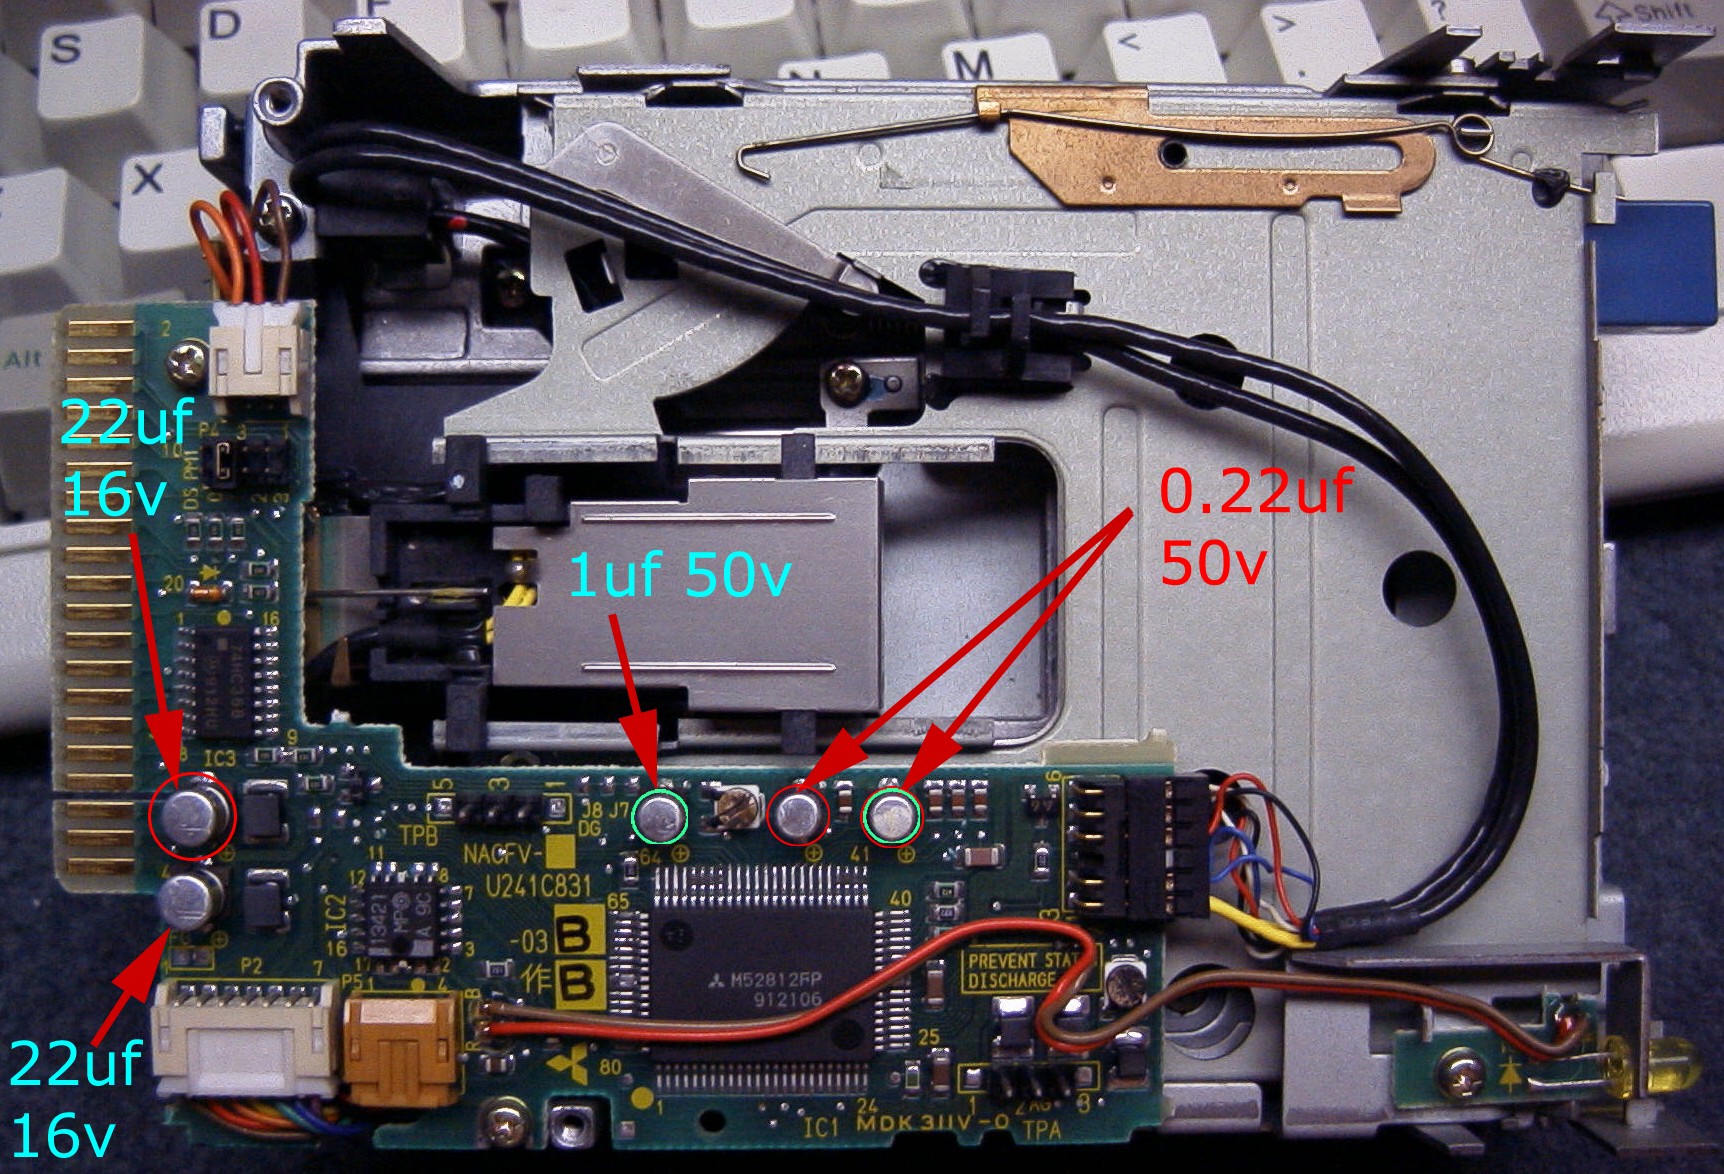
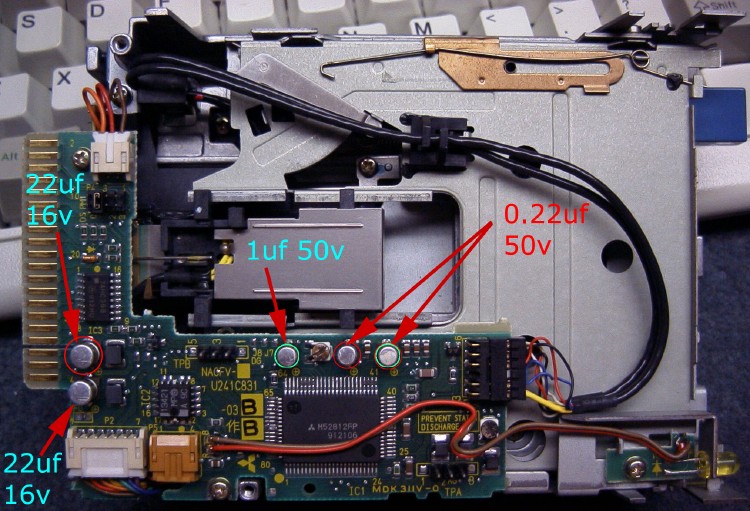
The Procedure
When I went to to start up my 8580s, I found that all three of my floppy
disk drives would not read diskettes. Two of them are manufactured by
Mitsubishi. Before shelving them, I decided to pull off the covers and poke
about. I found several surface mount electrolytic capacitors that were either
open or had very high ESR.
I successfully repaired both units by replacing the
capacitors indicated. The third unit is manufactured by Alps, and I haven't
looked at it (yet).
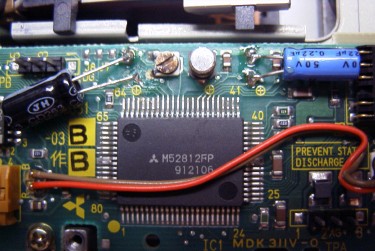
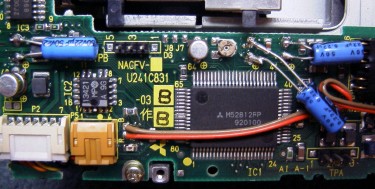
Ed. Tom: If you only have the classic through-hole
caps and you don't want to wait for the SMD parts to arrive, then sure, go for
it! It looks ugly, but it will work no problem. Otherwise I would suggest
getting the proper replacement - a set of electrolytic or polymer SMD caps
of the appropriate diameter and matching or slightly higher capacity/voltage
rating.
|