|
The go-to place for all IBM PS/2 and Micro Channel enthusiasts
|
|
|
Installing the PowerStacker 5x86
|
The
upgrade installation may vary according to the
type and location of your 486 processor socket.
Also, the orientation when installing the PowerStacker
5x86 will depend on the location of Pin 1 on
the processor socket. Included is a PGA Socket
Extender for 168-pin sockets and overhead-bar
ZIF sockets that prevent the retaining bar from
closing once the processor upgrade is in place.
Follow the steps below to install the PowerStacker.
Installing
the PGA Socket Extender (if needed)
Computers
that have a 169-pin socket do not need the socket
extender. If your computer has a 168-pin socket
or the overhead bar-type ZIF socket, you need
to install the PGA Socket Extender before you
install the PowerStacker. See "e;Before You Begin"e;
for more details about the socket extender.
When using the Socket Extender, it is important
to note the location of Pin 1 to avoid damaging
the PowerStacker and your computer. Since the
168-pin Socket Extender is missing the extra
pin, it is possible to plug the PowerStacker
in the wrong direction. Install the PGA Socket
Extender as follows:
- Locate
the beveled edge or white corner on the socket
extender. Align this edge, Pin 1, to the Pin
1 on the system board's processor socket.
- Position
the socket extender's pins over the holes
on the 486 CPU socket.
When the alignment is correct, gently press
the socket extender down until it is seated
properly into the socket on the system board.
- If
you have an overhead bar, lower the overhead
bar down to lock the extender in place. You
are now ready to install the PowerStacker
5x86 into the extender socket.
|
|
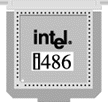
169-Pin
Socket
Extender
is NOT needed
|
 |
|
168-Pin
Socket
Extender
IS needed
|
 |
|
Overhead
Bar ZIF
Extender
MAY be needed
|
 |
|
 |
WARNING:
To avoid damage to your computer and/or
the upgrade, the Pin 1 on the PowerStacker
5x86 must align with the Pin 1 on the socket. |
The
orientation of Pin 1 on the PowerStacker 5x86
must match the Pin 1 location of the original
486 processor. Pin 1 of the 5x86 processor has
a white stripe and beveled edge or other distinguishing
mark. Pin 1 on the system board is usually denoted
by a beveled corner, arrow, dot, an extra pin
hole or other distinguishing mark.
Installing
in a Standard Socket
For Standard Sockets or sockets
with the PGA Socket Extender Installed:
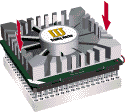
- Align
the PowerStacker's pins with the socket on
the motherboard. Be sure it's Pin 1 to Pin
1.
- Once
the alignment is correct, grasp the sides
of the PowerStacker 5x86 with your thumb and
forefinger.
- Apply
an even pressure while gently, but firmly,
pushing the PowerStacker 5x86 into the socket.
Repeat on opposite corners of the upgrade
until it is flush with the system board socket.
Note:
If the processor upgrade is resisting, stop
and check the pin alignment. If the alignment
is incorrect, remove the processor upgrade and
begin the insertion again.

|
|
Installing
in Side Bar or Retaining Screw ZIF Sockets:
- Make
sure the side bar lever is fully rotated upward
or the retaining screw is loose.
- With
the socket in the unlocked or open position,
align the pins on the PowerStacker 5x86 with
the holes on the ZIF socket. You do not need
to force the PowerStacker 5x86 into the socket.
- Apply
gentle pressure, only if needed, to make sure
the processor is completely inserted and flush
with the ZIF socket. Lower the sidebar lever
or rotate the retaining screw to lock the
socket.
Note:
If the processor upgrade is resisting, stop
and check the pin alignment. If the alignment
is incorrect, remove the processor upgrade and
begin the insertion again
|
|
|
Plugging
in the Fan (if necessary)
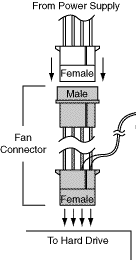
Some
PowerStacker versions come with one of
two types of fans. The first type of fan
has a power plug that needs to be connected
to the power supply, as shown here. The
second fan type is connected directly
to the PowerStacker module and requires
no additional installation. If
you have the first type of fan with
a plug, follow these steps to connect
the fan to the power supply.
- If
you have an extra power cable that is
not being used skip to # 5.
- Locate
the hard drive or other powered device
in your computer such as a CD-ROM.
- Disconnect
the power cable from the back of the
drive.
- Plug
the female end of the fan connector
into the hard drive.
- Next,
plug the power cable into the male end
of the fan connector. If you plug the
fan into an unused power cable, leave
the female end of the fan connector
unplugged
|
 |
Completing
the Installation
- Replace
any cards or drives removed earlier.
- Replace
the cover of your computer, and reconnect
the cords/cables.
- Check
that your computer starts correctly. It should
begin memory count and run its POST (Power-On-Self-Test).
If it does not boot-up, refer to the Technical
Guide for help.
Final
Speed Check Using SysChck
SysChck
is a utility located on the Trinity Works Utility
Disk or download here. It measures different
components in your computer. Trinity Works uses
this utility to measure the CPU speed and CPU
Throughput speed. you can measure the performance
of your computer by running SysChck before and
after the upgrade. SysChck must be run in DOS.
It cannot be run in the DOS shell through Windows.
Accessing
SysChck
- Insert
the Utilities diskette into the 3.5" floppy
drive or locate downloaded copy.
- If
you are in:
Windows 95, select "Shut Down"
from the "Start" button.
Select "e;Restart the Computer in MS-DOS
mode?"
Windows 3.1, select "File"
from the "Program Manager"
Select "Exit Windows" (and confirm)
- Change
to the applicable drive (A: )
- Change
the directory
cd syschck (enter)
- To
execute the program, type SYSCHCK at the A:\SYSCHCK
prompt.
- Press
"9" for SPEED. This will display the throughput
and CPU speed.
- Record
your speed and throughput for future reference.
Congratulations!
You have just increased the speed of your
computer! If you experience any problems, refer
to the Technical
Guide. If your problem is not listed or
if you have any questions regarding this product,
call Trinity Works Technical Support at 1-888-STACK-97.
|
|
|
|
|