|
Planar Power Supply Connectors Pinout (P1/P2)
Primary Power Supply Voltages
Planar Power Connectors
Power Supply Models
Jump-starting the Power Supply
Power Supply Overview
Short Power Leads
Removing Power Supply
Opening Power Supply
Power Supply Inside
Power Supply Fuse
Power Supply Fan
Thermal and Power Handling Capabilities
Power Supply Testing
Planar Power Supply Contacts
Power Supply / System Dead?
Cleaning Planar and Plugs
The power supply automatically switches to the 100-125 V AC range or to the
200-240 V AC range. The AC input is converted to DC outputs that supply the
system with proper operating voltages.
When the system is powered-off for 8 seconds or more and then powered-on,
the power supply generates a "Power Good" signal that resets system logic.
The presence of the 'power good' signal turns on the green power-on light on
the front of the system indicating that the power supply is functioning
correctly.
PSU Is Part of Case Structural Integrity
The Model 90 PSU must be part of the structural integrity of the 90 case.
Sorta explains why the little support arm by the floppy exists. That way, any
force on the back of the case is transferred through the PSU to the drive
support shelf at the front.
If the PSU is not mounted, then there is little support to keep the back of
the case from being bent forward...
Planar Power Supply Connectors Pinout (P1/P2)
 |
J26
(P1) | J25
(P2) |
 |
| |
Pin(s) |
Description |
Notes |
| |
P1-1; P2-2,3,4,5,6,7 |
GND |
|
| |
P1-2,3,4,5,6,7 |
+5V DC |
|
| |
P1-8,9 |
+12V DC |
|
| |
P2-1 |
-12V DC |
|
| |
P2-8 |
Power ON/OFF |
OFF: +5V, ON: Shorted to GND |
| |
P2-9 |
Power Good |
+5V if all primary voltages are stabilized |
Primary Power Supply Voltages
Check the voltages with connectors P1 and P2 plugged into the system board.
| -Lead Pin |
+Lead Pin |
Vdc Min. |
Vdc Max. |
| 1 (P1) |
2-7 (P1) |
+ 4.8 |
+ 5.25 |
| 1 (P1) |
8,9 (P1) |
+11.5 |
+12.6 |
| 2 (P2) |
1 (P2) |
-11.5 |
-12.6 |
| B |
D |
+ 4.8 |
+ 5.25 |
| B |
A |
+11.5 |
+12.6 |
Planar Power Connectors (thx Louis)
Original part: Molex 1796
3.96mm (.156") Pitch Single-Sided Edge Connector Housing - International Single-Sided PC Edge Connector Housing for Crimp Terminals
Terminals: Molex 1797
Single-Sided Edge - Connector Crimp Terminals, 1797 / 4295
P1/P2 Conductor Clamp

The 50 wire flat cable clamp is a TYCO / DEK 038-250 deklip / AEH 03-26-50.
The cable clamp is not really needed for keeping the power plugs on the
edge connector and away from the case cover. Try pulling a seated power plug OFF
a planar edge contact and you will understand why... So if yours is missing or
broken, don't worry about it too much.
Jump-starting the Power Supply
Shut down the machine, unplug power cord from the PSU and open the case.
Then unplug power supply cables P1 and P2 from the planar and connect the power
cord back to the unit.
Short pins 7 and 8 on the power supply connector P2 to start the unit.
The power supply cooling fan must come up almost immediately - if you hear
just a tiny clicking noise from the unit and power supply is probably defective
and has to be replaced.
If the built-in fan comes up, check voltages. If all of them are within the
given range the power supply is functional, at least without load connected.
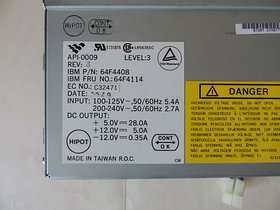
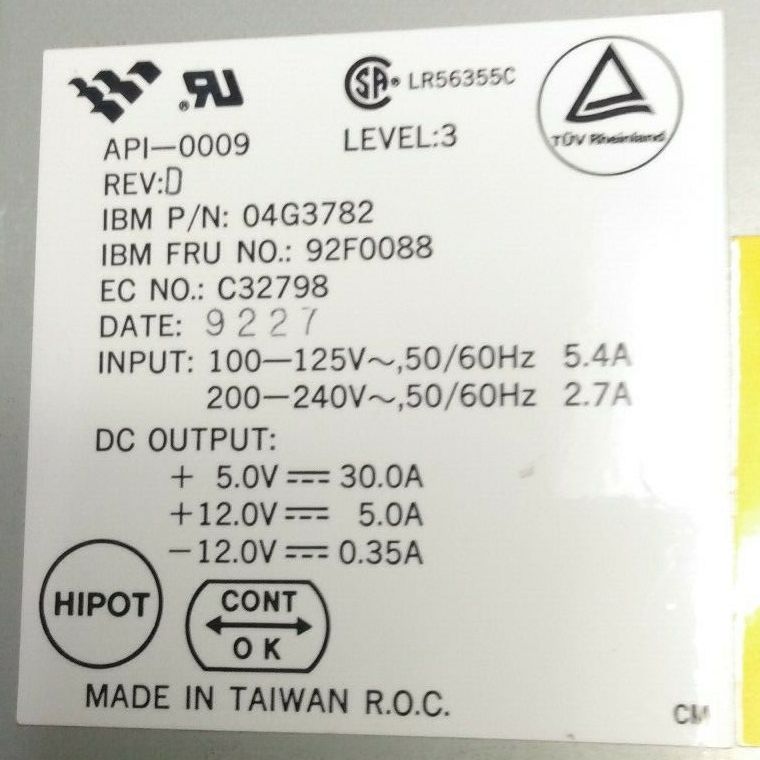
Power Supply Models
All units I've seen were made by AcBel Polytech Inc. You probably won't find
their name anywhere on the unit, but you can tell by the "API" model prefix, and
by the old AcBel logo:

There are at least three different PSU models for the 90. (I've heard rumors of a 150W PSU.)
Rich Wolos said:
The earlier ones had a sticker DC output of 5 V - 28 A and were
stamped "REV B". The newer ones are 5 V - 30 A, stamped "REV C".
Ed. Apparently there's also "REV D" - see
HERE.
Must have been around 1990, we got some that are "old sticker 28 A"
with "old leads" that have new part number on taped on, FRU 92F0088, covering up
FRU 64F4114, but they forgot to change the REV, still B - one such unit can
be seen HERE.
64F4114 194 W (from Jan 92 HMM), Yellow/Black power leads (like on the 95s)
| Rail | Max. Current |
|---|
| +5 V | 28 A |
| +12 V | 5 A |
| -12 V | 0.35 A |
92F0088 215 W (from 96 HMM), Red/Black/Blue power leads
| Rail | Max. Current |
|---|
| +5 V | 30 A |
| +12 V | 5 A |
| -12 V | 0.35 A |
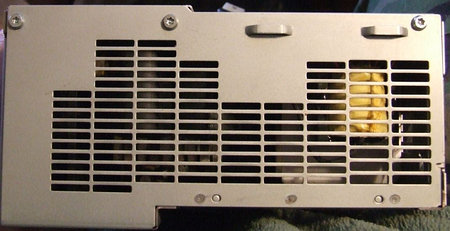
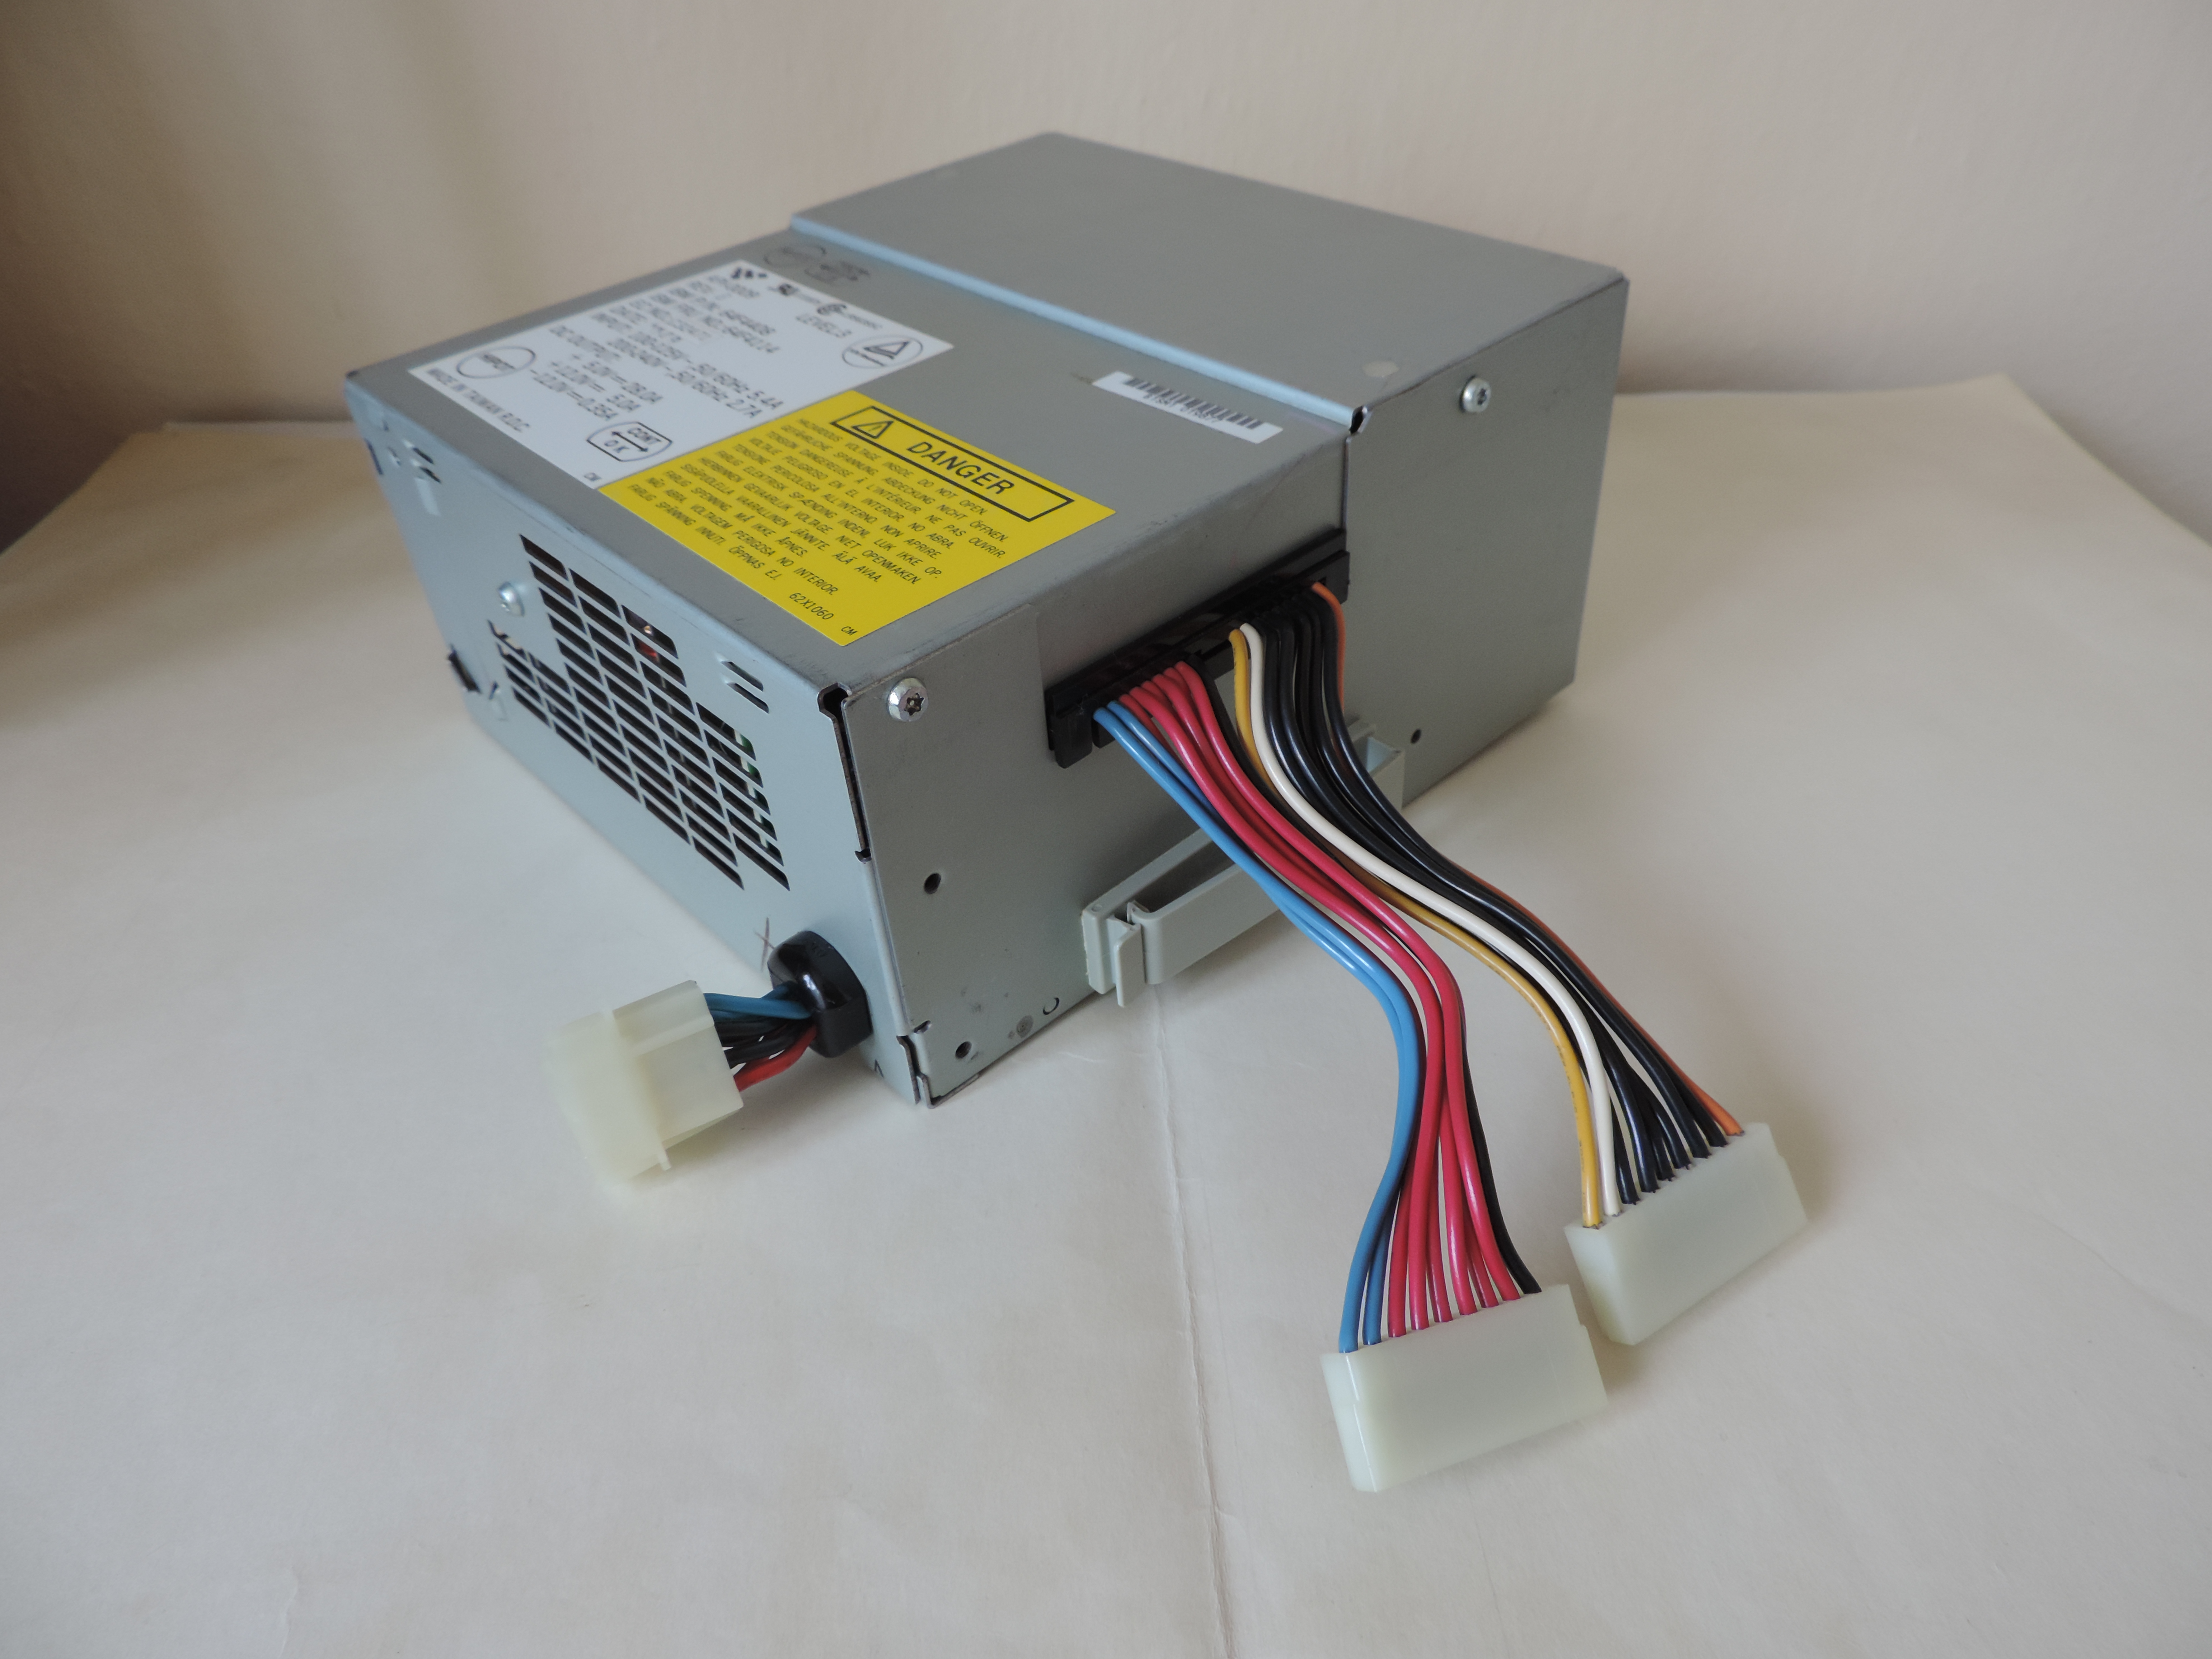
Power Supply Overview
PSU from my early 8590. Notice the short drive power leads.
No voltage select switch on the back side - this is an auto-ranging unit.
Notice how the front half of the top cover is slightly lower than the rest.
This was probably done to make space for the flat SCSI cable.
AcBel API-0009 REV B, 28 A @ 5 V (194 W), FRU 64F4114 and P/N 64F4408.
Different sample (found online HERE).
AcBel API-0009, still REV B, 28 A @ 5 V (194 W), but FRU 92F0088 and P/N 92F1617.
Revision "D" (spotted on ebay by Louis).
AcBel API-0009, REV D, 30 A @ 5 V, FRU 92F0088, P/N 04G3782. 3x Molex, long leads.
Short Power Leads
The older API-0009 REV B PSU has a very short drive power leads.
"I read about this in some old ECAs, someone was asleep at the switch and
the manufacturer cranked out a number of PSUs with very short leads. Nothing
wrong with them otherwise."
Rich Wolos referred to old PSU models with yellow/black wires, maybe he was
confused over the HD cables plugged into the blue/red leads? Or are there old
PSUs with short yellow/black power cables?
Tom says:
This seems very intentional to me. I would say it's just a
slightly different implementation of modular cabling. Similar to Model 95, it
allows you to remove the unused power leads to avoid cable clutter (something
that is very relevant for the cramped Model 90).
Removing Power Supply
Unscrew captive screw on Power Supply Bracket (1). Pull top up and forward,
away from PSU and continue rotating it forward until Bracket is free of bottom
clips on the PSU. Now pull Bracket towards the rear of the system until the
front tip can be pulled from drive shelf.
Unscrew both black slotted hex washer screws (2) from the back of the
system.
Note: If you use a small bladed screwdriver, it
may pop out of the slot on the 3/16 hex head / slotted screw. This can displace
some metal to the outer side of the screw head which will keep a nutdriver from
slipping all the way over the screw head... So... either always use a 3/16
nutdriver or a 3/16 wide screwdriver to prevent popping out of the slot...
Unscrew the single black slotted hex washer screw from the front case
support bracket.
Unplug the planar power supply sockets from the board and pull the PSU
straight upward, so as to unhook the tabs at the back of the PSU from the rear
wall of the case.
Opening Power Supply
You need a T-15 security Torx to open the PSU.
PSU Side, Towards Complex
There are three Button Head Torx Security Cap Screws on the inner side
(towards the complex).
PSU Side, Planar Power Cables
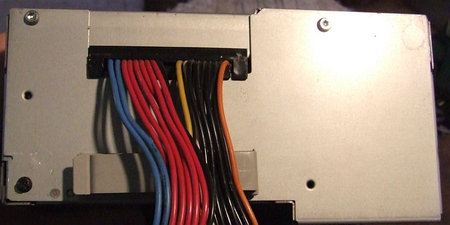
Two T15 are on the top edge on the outer side (towards the case). The black
front PSU support screw is in the bottom left corner.
Note: The black screw to the lower left corner
also fastens through the front PSU support bracket and into the PSU case. In
short, the cover will not come off with the black screw installed.
PSU Front, Heatsink
The one long T15 screw (towards the floppy) screws into a heatsink inside
the PSU.
Unclip the long cable retainer on the side and free the Planar power
leads.
Flip PSU upside-down. Pull the case (bottom) straight up.
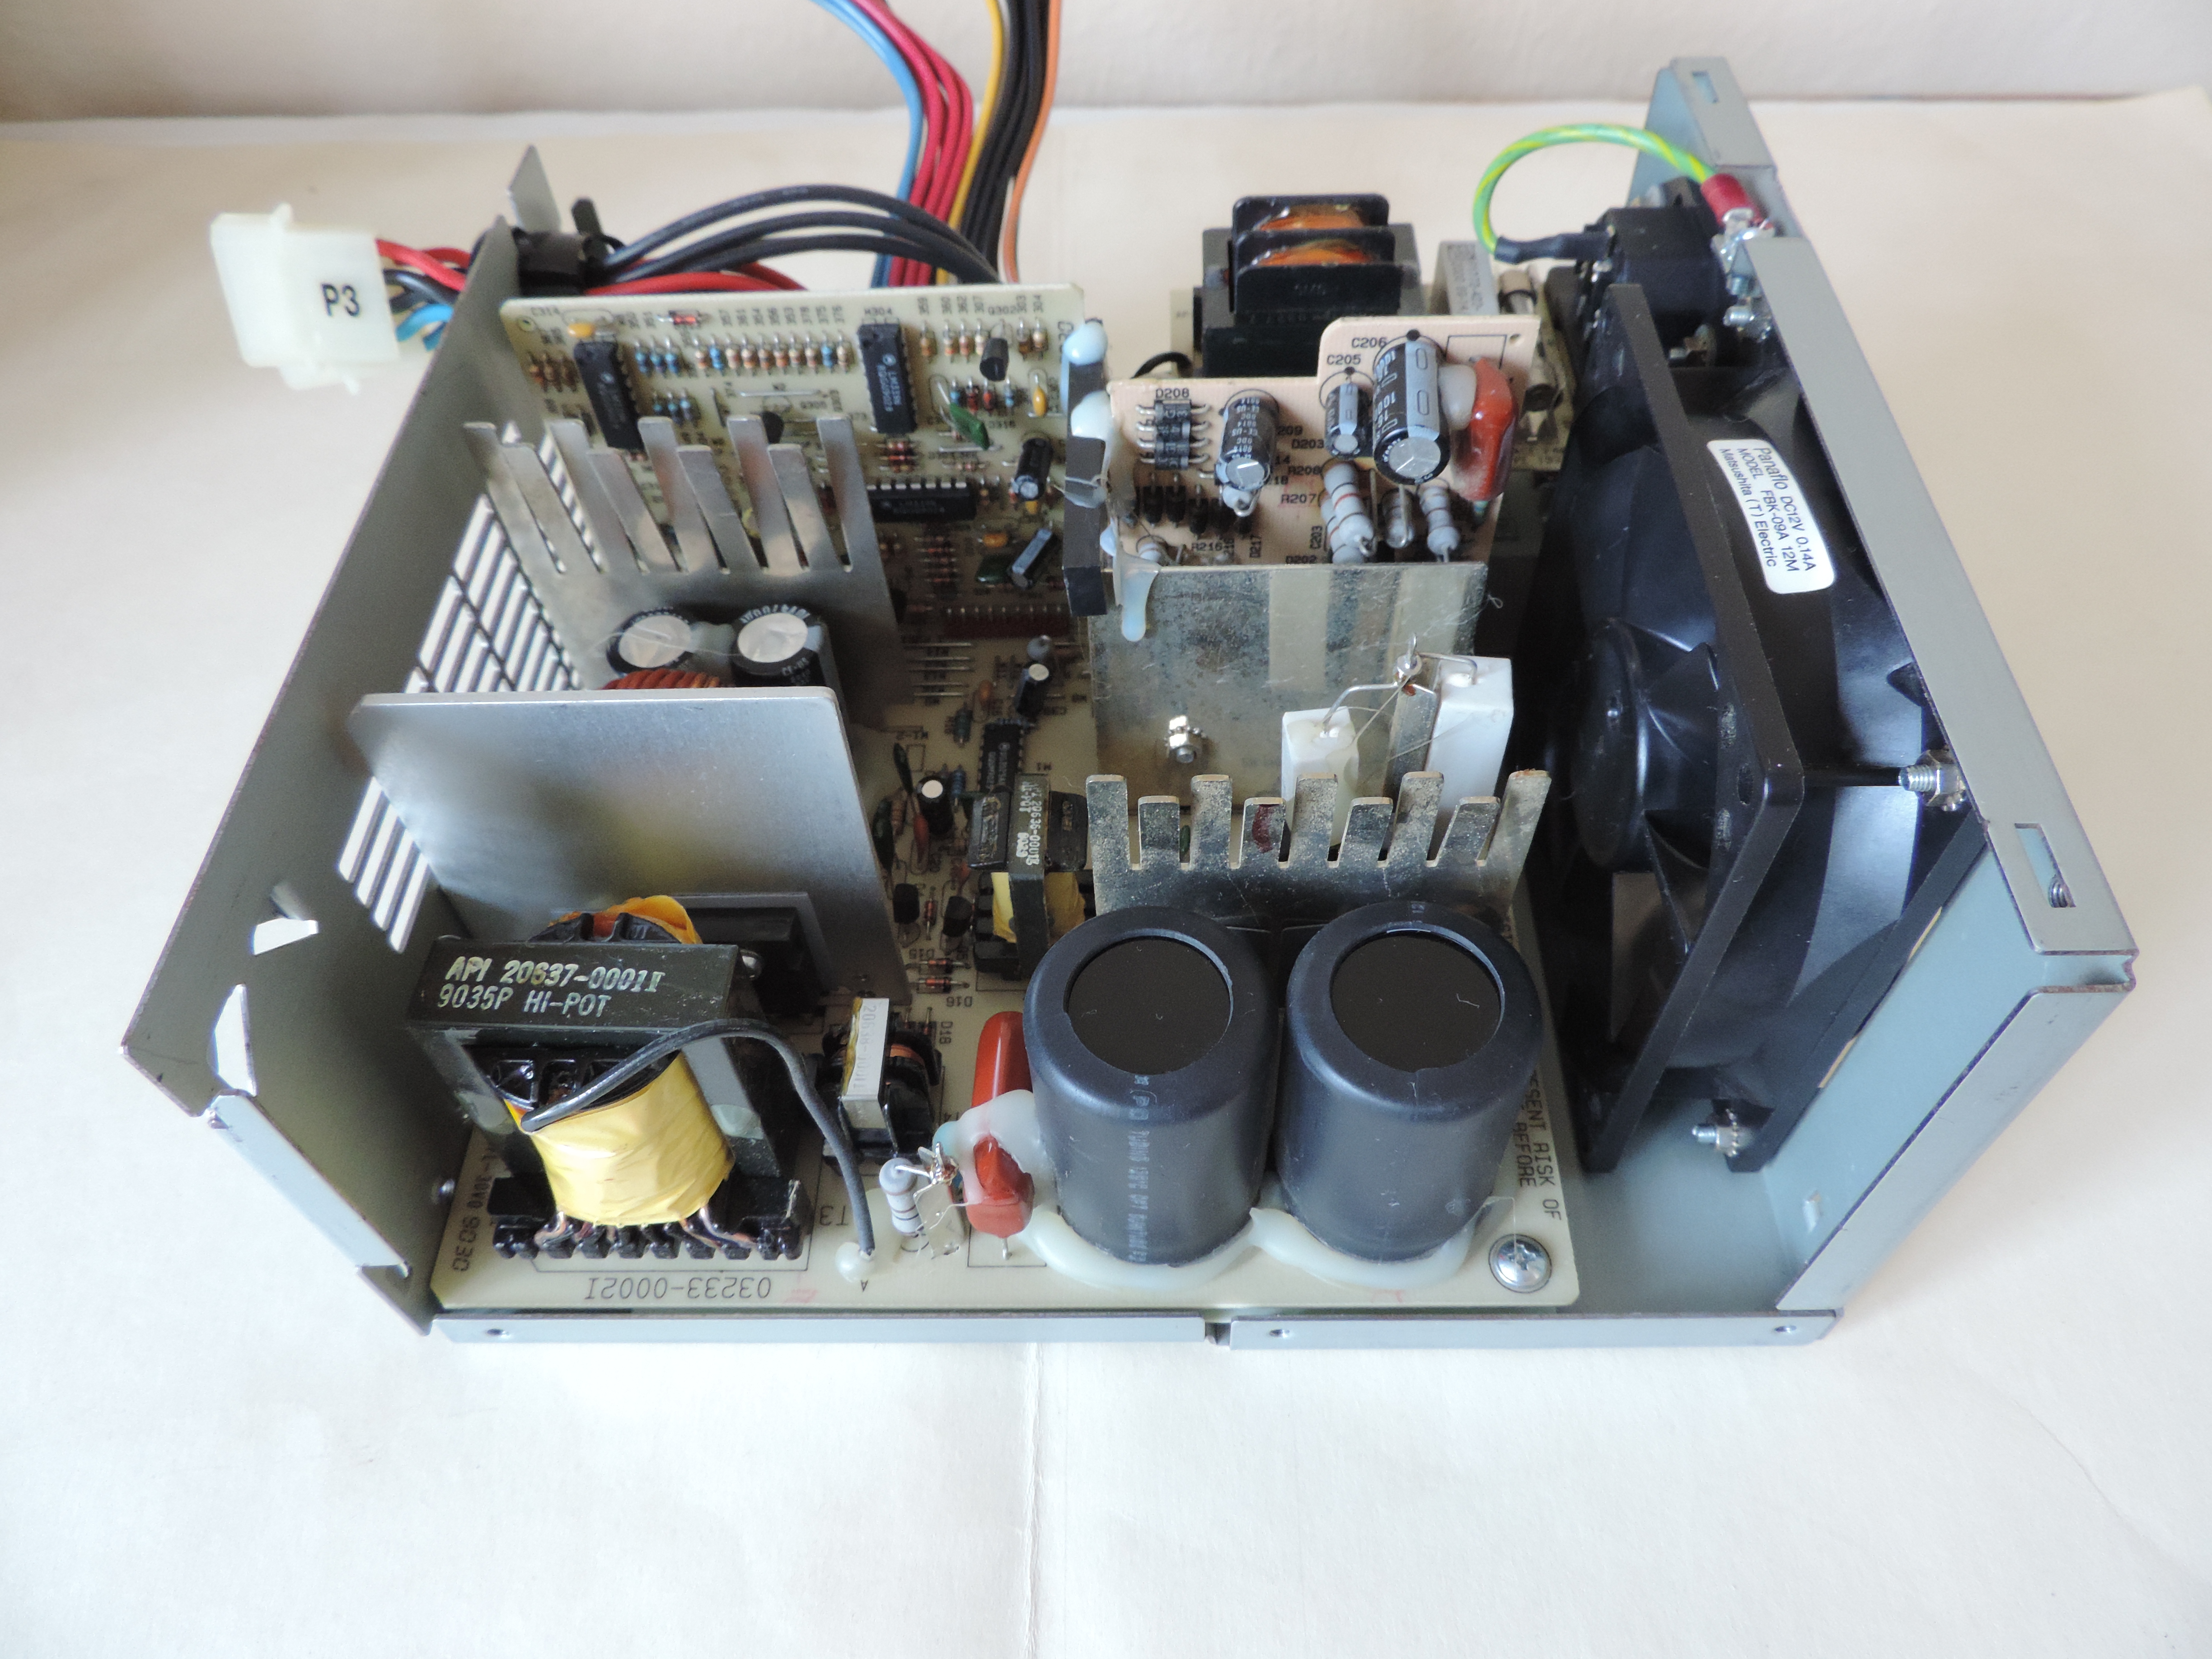
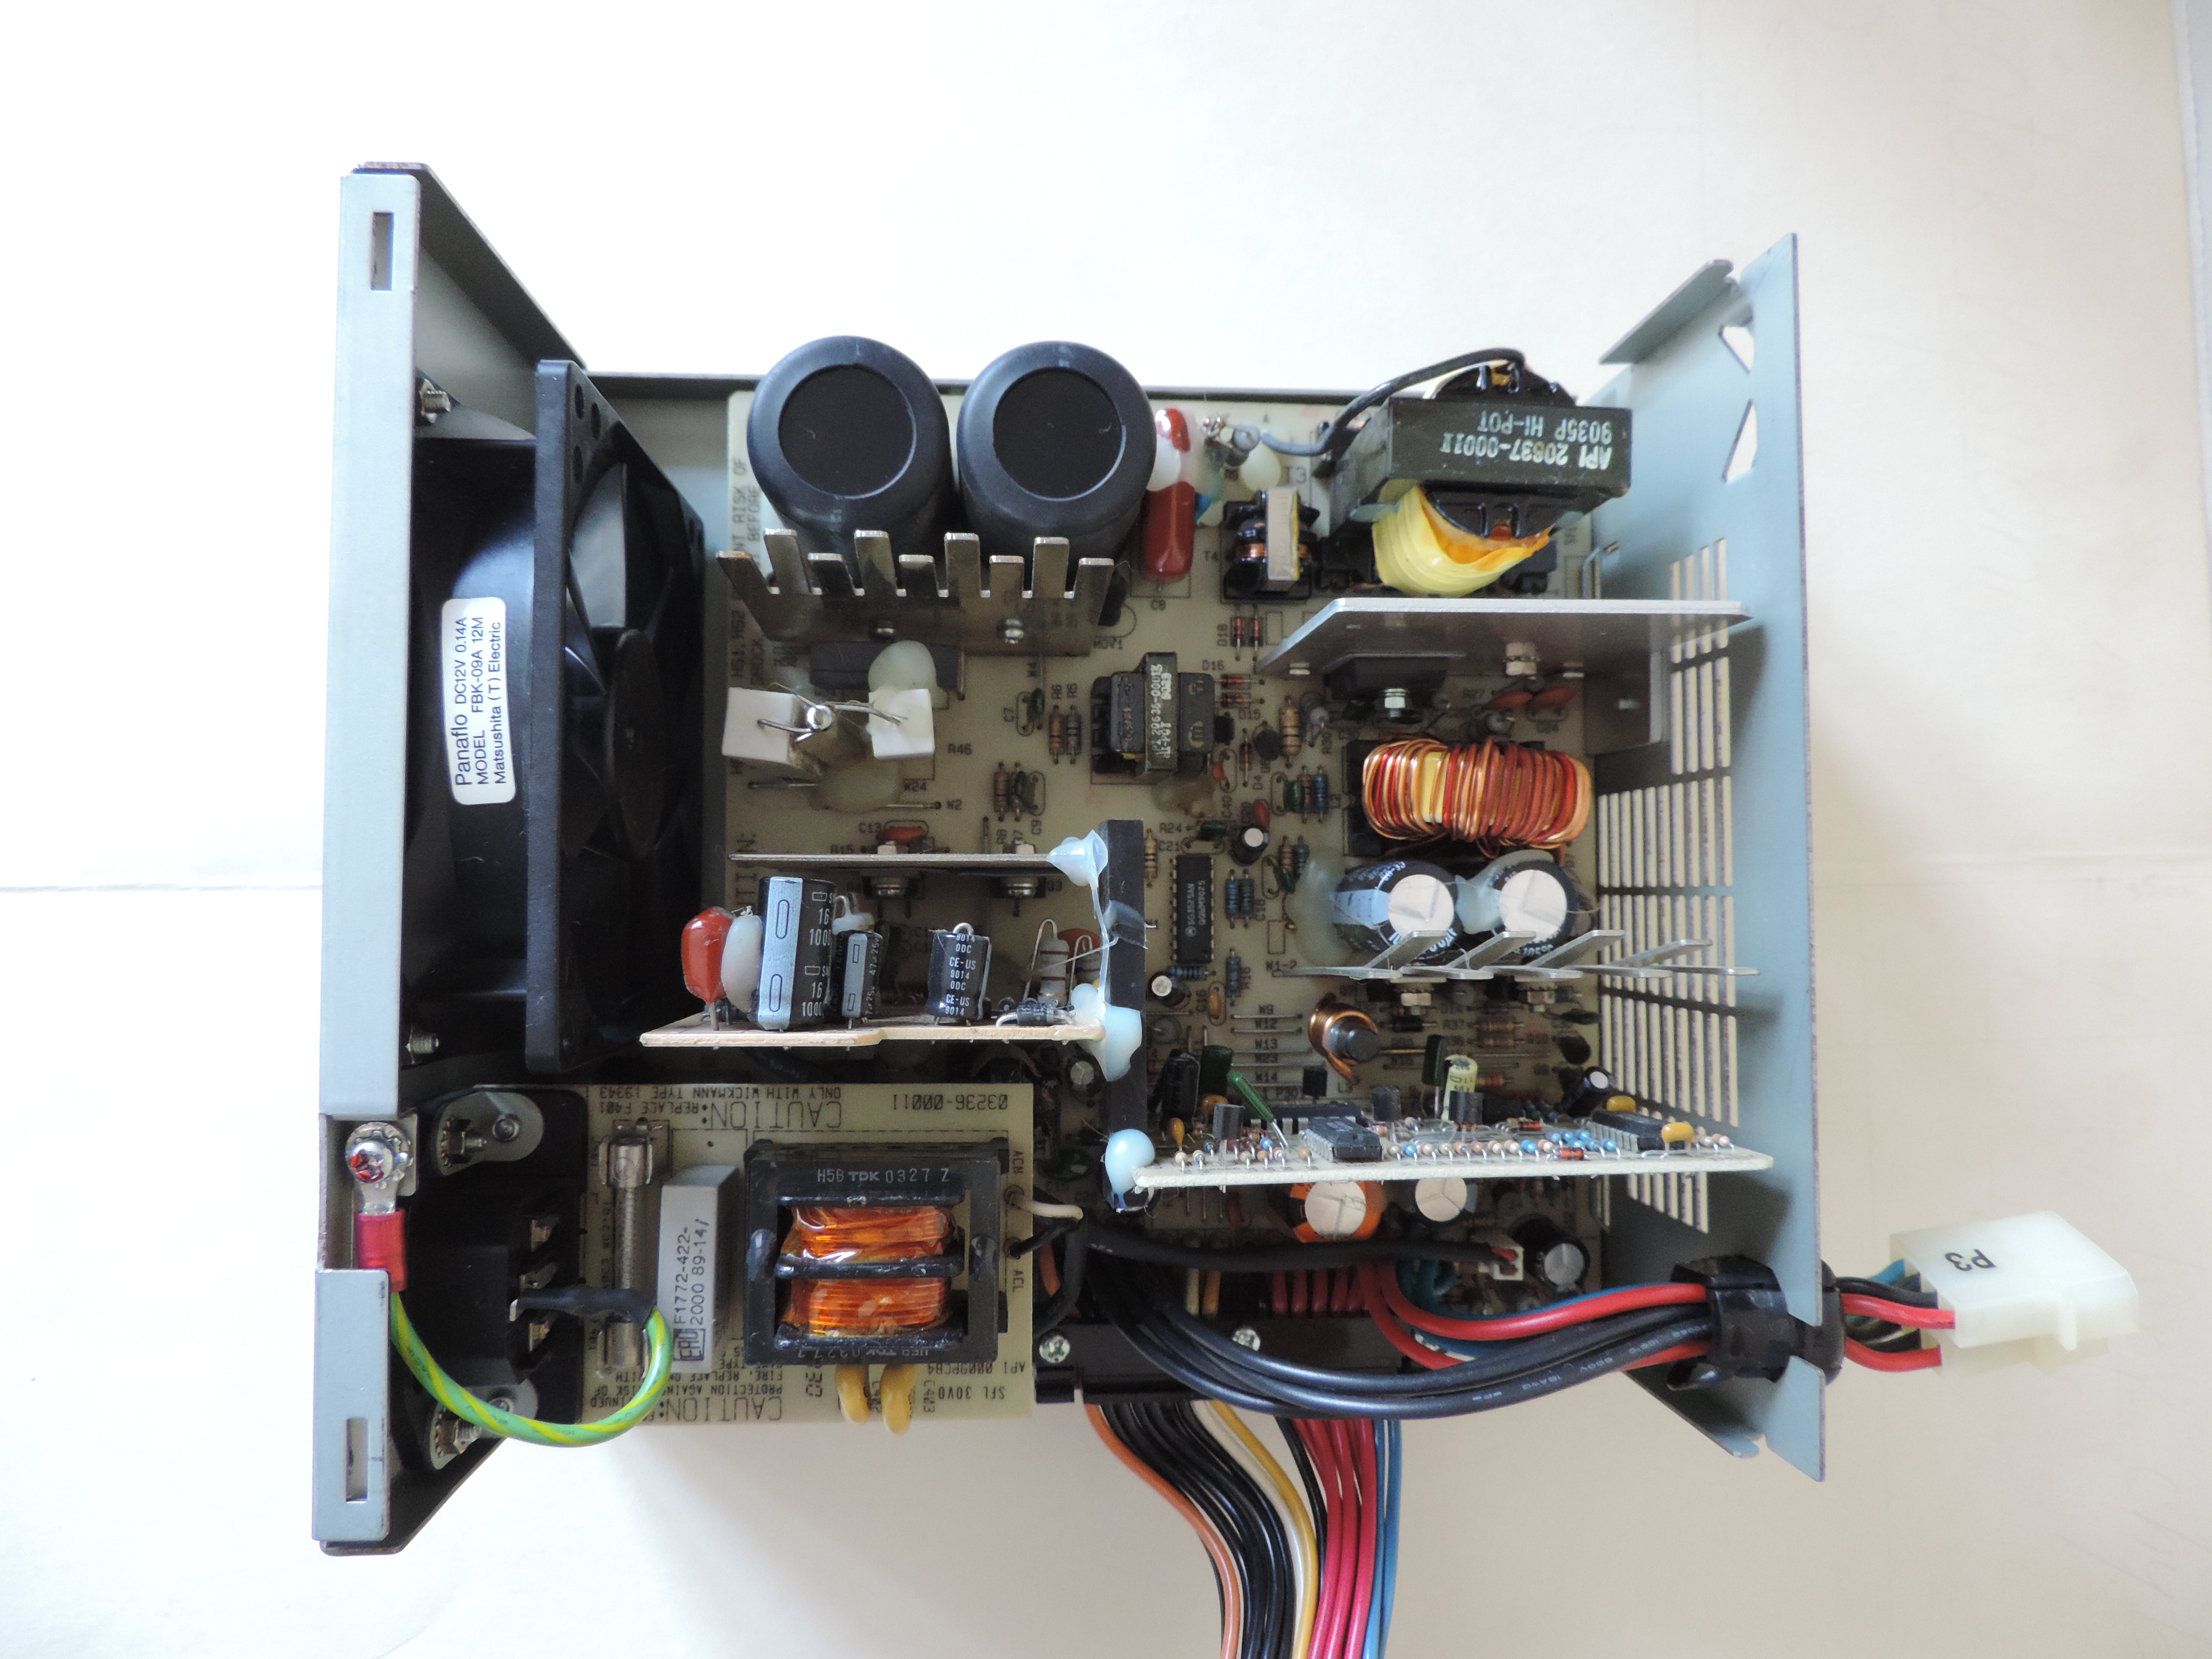
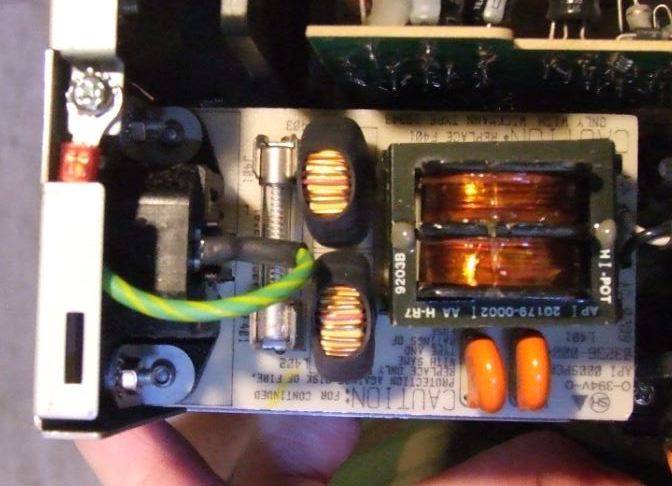
Power Supply Inside (API-0009 REV B, FRU 64F4114, 194 W)
Power Supply Fuse

F401 is T6.25A / 250V, "Only replace F401 with Wickmann 19343" "T" stands for Time.
Wickmann 19343 Datasheet or 03136.25
- 313 Series 3AB/3AG (6.3x32mm), Slo-Blo Fuse
Warning! The Model 90 HMM says "3 Amp Fuse 72X8561",
which is dead wrong! Obey the machine...
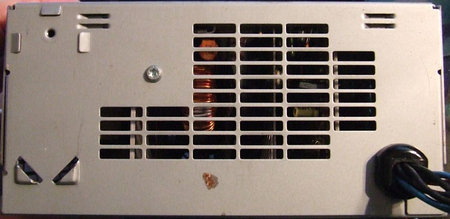
Power Supply Fan
Panaflo
Model FBK-09A12M
DC12V 0.14A
Matsushita (T) Electric
Panaflo FBK-09A12M Specs
Motor Type [FB]: Panaflo (DC Axial-flow fan)
Bearing Type [K]: Ball Bearing
Housing Size [09]: 92 x 92 mm
Housing Thickness [A]: 25.5 mm
Rated Voltage [12]: 12 VDC
Speed [M]: Medium - Maybe 2450 RPM
Power: 1.13 W
Air flow: 41.0 CFM (about 1.15 m3/h)
Air pressure: 3.3 mm H2O
Noise: 31 dB-A
Remove PSU Fan
There are four T15 Flat Head Torx Security Cap Screws that fasten the PSU
fan frame to the back wall of the PSU case. There are 4 captive tooth washers
(Tooth Washer Lock Nut) on the inside. When replacing the fan, you really need
a locking hemostat to hold the captive tooth washer on the inside of the
PSU.
The PSU quality is similar to a 8595 PSU. The heatsinks are thinner than on
a Model 95 (about 1/16ths to 3/16ths), but for a 215W PSU they are quite
acceptable.
PSU Fan Power Connector
Original P/N on terminal housing is 5051. Engineering/Old PN: 5051-02
Part Number: 0022011022 2.50mm
Pitch KK Wire-to-Board Housing, Female, Friction Lock, for 2759/5159 Crimp
Terminals, 2 Circuits
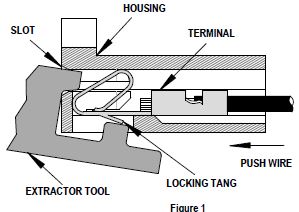
Extractor Tool
(HT-2759) Removal of all 2.54mm (.100 in.) "KK"
Terminals
- Push the terminal forward in the housing so that the locking tang is
clearly visible.
- Insert the tool into the interface opening (slot) of the connector housing
on an angle as shown HERE.
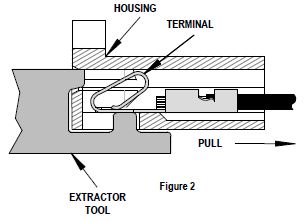
- Rotate the extractor tool into the position shown
HERE.
This will depress the locking tang of the terminal and allow the terminal to be
removed by gently pulling on the wire.
Note: Or you could use a jeweler's screwdriver or
a bobby pin to push the locking tang up. If I was doing LOTS of terminal
replacement, I might buy his tool. For one or two, let me dig through my
toolbox or kitchen drawer...
This information is presented here, just in case I need it in replacing the
stock fans with some Noctua models...
Thermal and Power Handling Capabilities
("Little Big 90")
I'm worried about heat during extended sessions. There are no drives in the
case sucking power and no bulky SCSI cable, but that still doesn't resolve the
fact that the 90 really wasn't meant to take a Pentium.
From Al Savage:
You know, I've heard this before and I admit that I just don't get
it. I've been running, for over a year, two 8590-OLFs with P66 complexes, 24x7:
one running OS/2 Lan Server over W4 FP13, plus the text mode SETI client, plus
FTP server by Peter Moylan, two internal HDDs and a CD-ROM, and several
external SCSI devices, and EVERY slot filled; the other running W4 FP13 and
Apace/2 plus the SETI client, one HDD & CD-ROM.
The SETI clients make sure that processor utilization is always at 100%, so
the CPUs are running as hot as they can ever will. The P60 & P66 run a lot
hotter than the P75/P90/P100 etc (13 watts, IIRC), and I can put my hand on the
heat sink and not get burned. Hell, my AMDs run hotter. No baffle, the front
case fan moves about twice the air that any of the clone cases do. The CPU's
heat sink is still directly in the airflow.
I *do* keep the case vacuumed out, though. I take the covers off every six
months and Kirby the guts. Dust builds up rapidly, and is an excellent
insulator. Both units are on a 3.1VA (BIG!) UPS. My opinion is that cooling is
not a problem on the 8590. I have not had to replace the PS. I keep a "spare",
pre-configured identical 8590 as backup (just swap in HDD & go), but I've
never used it.
Ed. With either a 194 or 215W PSU, the 90
compares favorably with the 9577 PSU, which was 194W. But nobody complains
about the "weak" 9577 PSU, do they?
Power Supply Testing
Peter Wendt says:
The most important point is that the "testing the power supply"
topic extends only on testing the thing as "one box" and *not* open it. You
should leave that to trained experts, because it bears some risks - from which
sudden death is the most evil (can spoil the whole day - and more). This sort
of "shocking experience" should be left out.
The easiest way to test the power supply if it is still working at all is to
open the case, look at the right side under the power supply, locate the 2
plugs from the power supply to the planar and carefully unplug them by simply
pulling them out. It might be a bit difficult to get them back this way - but
if the power supply is broken you will have to remove it anyways when you get
another one, so we can leave that at the moment.
Now, once you got the two plugs pulled out - look at them. The one "P1"
marked connector has 2 blue, 6 red and 1 black cables... that's the lesser
important one at that point. The second "P2" marked is the one we need to look
at closer. Do the following: re-attach the machine to the AC, then use a piece
of wire or a bent paperclip and connect the white wire with one of the
neighboring black ones.
No danger - the highest voltage on that side of the power supply is +12 VDC.
the white line is "+5V sense voltage" and the black one is GND. As long as the
white wire isn't attached to GND the other voltages are 0 VDC (power supply
deactivated) so there is no risk of accidentally shorting any voltage at
all.
In case the connection is good and the power supply itself is functional the
power supply fan should come up - and most likely the machines' hard-disks as
well, which are directly attached to the power supply with 4-wire DC cables. If
the power supply comes up the problem sits somewhere else:
- broken connection between ON/OFF switch and board (low - voltage)
- broken planar
- defective complex (but at least the green power-LED should light up then)
In case nothing happens apart from a faint "click" inside the
power supply... now... get familiar with the idea of getting a spare from
somewhere. It often pays trying to get an entire working machine rather than
only a power supply.
Mod. 8590 without hard-disks and memory often sold for some 30 - 40 bucks...
some ask 40$ for the power supply alone. The 9590s may cost some more - the
power-supplies however are identical as far as I know. The main difference
between an 8590 and a 9590 is the 1.44MB FDD on the 8590 and that some versions
come with only a 512K XGA-1 on the planar. Everything else (processor board,
memory, power supply, hard-disks) can be interchanged among the models.
A high pitch whistle indicates the PSU will not pass this test and is
broken. Usually these power-supplies are pretty reliable - some of them suffer
on "long term problems" with dust contamination and related overheating. In
case there were an over-current condition (overload on +5V / +12V lines) it
should come up in the above-mentioned test - if that malfunction is not caused
by the hard-disks. Try detaching the 4-pin power-plugs from the hard-disk(s)
and retry... if the malfunction persists even with nothing attached to the
power supply it is definitely broken.
To fix these kind of "switching power supplies" you need some more equipment
than only a multimeter, a pair of scissors and a roll of duct-tape. Parts
inside these supplied are directly connected to mains AC and converted into DC
impulses of hazardous voltages and frequencies... so I would not even
recommend trying to open the box if you do not exactly know what you are doing.
In case of doubt: leave it as it is. There are a few "power supply gurus" out
which may be able to repair the unit - but they are hard to find.
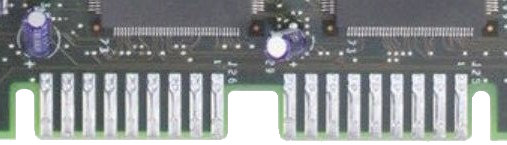
Planar Power Supply Contacts
Power Supply / System Dead?
Symptoms:
PSU taking extremely long to turn on. System randomly turning
off/on or rebooting.
Wolfgang Gehl says:
The planar power connector seems to be the problem. The 90 (Little
Big 90) uses a card edge connector on the planar that the PSU plug fits over.
Check the planar connector for oxidation or weirdness of the solder pad
contacts.
Carefully clean the planar's card edge power connector. For
whatever reason it tends to oxidize heavily. I've been there and it works for
me.
Peter said (edited):
This machine is also known for burning the contacts on the planar
where the power supply connectors go to. The PCB contacts oxidize and the
current drawn makes them get hot. After some time the area around the contacts
gets brownish and the machine looses contact and doesn't power-on anymore. This
*can* be fixed in many cases by re-flowing the contact surfaces with a thin
layer of solder or with liquid silver (as used for rear window defoggers on
cars). The inside of the power supply plugs however needs to be cleaned (with
a contact cleaner or TV tuner cleaner spray) to remove the oxidation.
Cleaning Planar and Plugs
Rick Ekblaw had way too much time on his hands:
There's not
an easy way to check the power supply connections, but there is a simple way to
clean off oxidation and re-establish a good connection from the power supply to
the planar, as follows:
- Remove the power supply from the case. Look HERE.
First, remove the power connections from any internal devices (hard drives,
CD-ROMs, etc), remove the sheet metal "bracket" between the power supply and
the drive cage, then remove the screws in the back. "Flop" the power supply 180
degrees from left to right to make it easier to access the planar power
connectors, and then remove the connectors.
- At this point, you can easily look at the planar and power supply
connections, and they'll probably look OK. Don't be fooled. Take a small piece
of ScotchBrite (that green plastic scrubby stuff that is frequently used to
scrub pots and pans) and LIGHTLY buff the planar solder pads to make them nice
and shiny. Buff the power supply connector fingers with an emery board - again,
just a light touch is needed, rub each finger two or three times.
- Slide the power supply connectors on the motherboard pads, then remove the
power supply connectors again. Do each of the pads show marks where the power
supply connector fingers dug into the solder pads? If not, you need to
re-tension the fingers that did not make a mark.
- Once all the fingers make marks, re-install the power supply and power
connections to your devices. Power up and enjoy reliable 9590 power for several
more years.
| 


