|
5140start_v100.zip IBM PC Convertible Start-Up Diskette v1.00 (31 Oct 1985, 6280631)
![[P]](/other/img/photo.gif)
5140start_v101.zip IBM PC Convertible Start-Up Diskette v1.01 (18 Mar 1986, 59X9546)
5140start_v102.zip IBM PC Convertible Start-Up Diskette v1.02 (01 May 1986, 74X9774)
5140start_v104.zip IBM PC Convertible Start-Up Diskette v1.03 (20 Jun 1986, 84X0107)
Zipped images. All disks imaged by David Beem.
5140star.exe IBM PC Convertible Start-Up Diskette v1.01 (self-extracting executable)
Produces the same disk as 5140start_v101 above.
pccadv11.zip PS/1 Advanced Diagnostics Diskette (zipped image)
186-049 5140 Models 2/22, 5144 Mono Display 1, 5145 Color Display 1
187-140 5140 Model 003 And Backlit LCD Option Kit
187-006 New Special Features And Functions For 5140 Models 002 / 022
PC Convertible Technical Reference Volume 1, Feb 1986 (6280655)
PC Convertible Technical Reference Volume 2, Feb 1986 (55X8817)
PC Convertible Hardware Maintenance and Service, Feb 1986 (6280646) (thx Joe Bossalini)
Low-res IBM 5140 Convertible photos (MAD Max)
IBM 5140 Convertible photos (oldcrap.org)
IBM PC Convertible (5140) Battery Pack "DIY"
5140 Memory (memory cards types & pinout)
5140 Video (LCD displays, CRT adapter)
System Description
5140 Planar
Floppy Drive
Battery Pack
Battery Charger
Automobile Power Adapter
5140 Printer
Serial-Parallel Adapter
Internal Modem
Internal Modem Pinout
Internal Modem Board
Speech Adapter
Opening the 5140
Carrying Case
System Description
The 5140 is available in two models. The Model 2 is equipped with a CMOS
80C88 microprocessor, 64 KB ROM, 256 KB RAM, an 80-column by 25-line detachable
liquid crystal display, two 3.5-inch diskette drives, a 78-key keyboard, an AC
adapter, and a battery pack. Also included are an Application Selector,
SystemApps, Tools, Exploring the IBM PC Convertible, and Diagnostics.
The Model 22 is the same as the Model 2 with Diagnostics only. Both systems
can be expanded to a maximum of 512 KB RAM via 128 KB RAM memory card features,
and may include an asynchronous modem in the system unit. The Model 003 has a
backlit LCD and uses 256K memory cards.
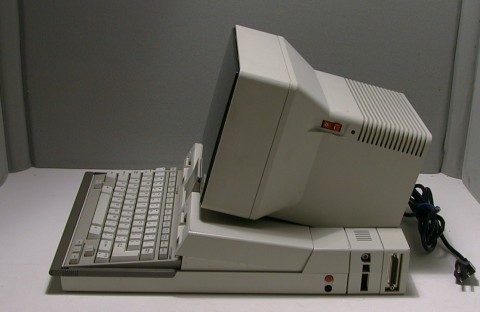
At the back of each system unit is an extendable bus interface. This 72-pin
connector allows any or all of the following options to attach to the base
unit: Printer, Serial/Parallel Adapter, and CRT Display Adapter. Each of these
features is powered from the system unit. The CRT Display Adapter operates only
when the system is powered from a standard AC Adapter. A separate CRT display
or television set attached via the CRT Display Adapter requires a separate AC
power source.
5140 System Unit Options
Optional Displays
Other Supported Options
- IBM 5153 Color Display 183-002 Color Display, 5153
- IBM PCjr Adapter Cable for the IBM Color Display (#0021)
- IBM 4863 PCjr Color Display
- IBM PCjr Connector for TV (#0020)
- IBM Communications Adapter Cable (#2067)
- IBM Proprinter (#4201)
- IBM Graphics Printer
- IBM 3708 Network Control Unit
- IBM 3710 Communication Adapter
- IBM Personal Computer Printer Cable
- IBM 5841 Modem - 1200 bps
All IBM Personal Computer, IBM PCjr, IBM Personal Computer XT, IBM Personal
Computer AT, or IBM Portable Personal Computer options, adapters, and devices
not specifically listed above have not been tested on the IBM PC Convertible
System and are not supported.
DOS 3.2 or higher is required. (to support the 720K floppy)
5140 Planar

No silkscreen, no reference designators, single-side load, all parts
surface mounted (including the through-hole components!).
6453806 Interrupt, KB, Audio, system clock, I/O controller
6453807 DMA Controller
6487157 Floppy, Printer, system timer
6487158 LCD Controller
SRM2064M15 LCD Controller RAM
MC146818AFN RTC
SMM6326CBK ROM
30-pin socket Modem Connector
Memory header More info HERE
Extendable Bus Interface
>Don, you mentioned that the 72 pin connector is ISA,
but multiplexed.
Difficult. I looked at hacking ISA bus cards onto the Convertible bus. The
main problem is that the address and data lines are multiplexed to get it all
on the connector. You need extra logic to separate the address and data lines.
I visualise a CRT slice (in this part of the world, they were cheaper and more
common than the serial/parallel slice), with the CGA logic removed, and a slot
in the top of the slice with an ISA riser sticking out. If you have the
upgraded power supply (originally released with the backlit LCD option, but
standard in later production), you should be able to run at least 2 ISA
adapters if they aren't power hogs. Anyone got the schematic diagrams for the
CGA slice?
Floppy Drive
3.5" 720K Toshiba 4452A0P11 with a 34-pin edgecard connector. Both drives
are jumpered DS1.
3.5" 720K ALPS DFL413C02B, 34-pin edgecard. There are two jumpers on the top-
SW1 (right rear corner) is jumpered "1", J1 (center-left front) is jumpered
"B-C". Floppy bezel snaps on drive case. I have used an 8580 cardedge floppy
with the big button- slipped right in, bezel snapped right on (now to figure
out how to get 5140 to recognize 1.44!). I see no P/N or FRU on it.
From Don Hills:
There were 2 models of floppy drive: Toshiba and Alps. The Toshiba
used a metal band to drive the heads up and down, the Alps used a leadscrew.
The leadscrew model could not step the heads at the full stepping rate of most
PCs, so the stepping rate was set slightly slower in the BIOS. Trouble was, the
metal band type drive was designed for full speed, and was very noisy when
seeking at the slower speed. I wrote a small driver that loaded (and unloaded
again) during boot to reset the step speed on machines with the faster drives.
The drives looked identical externally, you had to look in the slot or remove
them from the case to see the difference.
Battery Pack P/N 2684331
Rating: 9.6 V, 1.8 Ah
Additional info about the battery pack and how to rebuild it can be found
HERE.
From Gfretwell:
There were some guys on the VM 5140 Forum who talked about how to
cut the battery pack apart with a Dremel and replace the cells with industry
>C cells. There is also a fuse in there.
From Don Hills:
I was one of those guys. If you couldn't get the "sub C" cells,
the trick was to use standard C size cells and duct tape them into a pack the
same shape as the original. This "naked" pack fitted in the same space as the
original pack-plus-case. The battery compartment was all plastic so the new
pack was well protected. Use Standard charge rate cells.
Consider standard C cells (with tabs) instead of sub-C, if they are cheaper
yet. The only reason for sub-C cells is that they will fit back in the battery
case. I used standard C cells (not even solder tabs, but I am good at
soldering).
Of course they did not fit in the case, but I wired them up in the same
physical pattern to the old cells, re-using the connector and thermal fuse from
the old battery. Then I placed strips of cardboard where required between the
cell ends to stop them shorting, sandwiched the cells between two sheets of
cardboard cut using the old case as a template, and bound the whole lot in
plastic insulation tape.
This package looked untidy, but fit just fine in the battery compartment.
Since the battery compartment is a complete plastic box in its own right, the
original battery pack casing is not essential.
Open the pack with a hammer and chisel. Clamp the pack on its side lightly
in a vise with a piece of wood under it for support. Or, take a piece of scrap
lumber and nail 2 short bits of 2x4 to it spaced so as to snugly hold the pack
on its side. Apply chisel to the case join and tap a little harder each time
until it cracks. Start at a corner and work around the pack.
As for the power supply, as I said in an earlier post there was a US-only
110V "wall wart" that was only powerful enough to charge the battery when the
system wasn't running. There was also a universal (100 to 240 volts) power
"brick" (P/N 2684292) much like those used on modern laptops, that provided
enough power (15 volts DC, 2.7 amps) to run the system and all accessories
while charging the battery.
The plug is the type that has a metal outer barrel as one contact and a
metal-lined hole down the middle (Center positive) that is the other contact.
Size: now pay attention here. 5.5 mm external diameter, 2.5 mm internal
diameter. They also come in 2.1 mm internal diameter, so don't get the wrong
one.
Battery Charger (#4060)
A 110-volt input feature designed to be used to charge the internal
batteries of the system. It does not provide sufficient power output to allow
system operation while the batteries are being charged.
Automobile Power Adapter (#4065)
Designed to charge the system battery while allowing simultaneous use of the
system unit. The adapter attaches to the system unit and plugs into the
cigarette lighter outlet in a vehicle with a 12 volt negative-ground electrical
system.
5140 Printer (#4010)
Attaches to the back of the system unit, or to an optional printer
attachment cable for adjacent printer operation. It is an intelligent
CPU-based, 40 cps (burst rate) serial, non-impact dot matrix design capable of
low power operation. It draws its power and control from the system unit.
Standard ASCII 96-character, upper-case and lower-case character sets are
printed using a high-resolution, 24-element print head. An
all-points-addressable (APA) print mode for graphics is also provided. NLQ
printing can be accomplished using either a thermal transfer ribbon on smooth
(60 Sheffield units, maximum) paper, or no ribbon on heat-sensitive thermal
paper. Draft-quality printing may be achieved using the thermal transfer ribbon
on IBM Multi-System Paper (P/N 7034548) or equivalent.
Printer Controls
There are three controls- A slide potentiometer on the left is for Density,
left is light, right is dark. A two position switch in the middle, left is
Off-Line, right is On-Line. A button is on the right for Line Feed. There is a
blue lever on the left corner for clamping the guide against the roller. A
paper advance wheel is on the right.
Detach Printer
Open printer cover. Look on the left side of the printer at the front corner
of the smoked plastic cover. Notice the well with the silver loop. Lift up and
pivot it out. This unlatches the left side, and the right side is just a pivot.
Twist off the slice, pivoting it to the right.
Printer Cable (#4055)
A cabling accessory 22 inches (0.6 meter) in length with a custom 72-pin
system-type connector attached to each end. It provides the user the option of
operating the Printer (#4010) immediately adjacent to (that is, physically
detached from) the system unit, to provide flexibility of placement for
ease-of-use and visibility. Mad Max has one of these, looks like
THIS.
Serial/Parallel Adapter (#4015)
The adapter provides an RS-232C asynchronous communications interface and a
parallel printer interface that are compatible with the IBM Personal Computer
Asynchronous Communications Adapter and the IBM Personal Computer Parallel
Printer Adapter. Looks like
THIS.
Internal Modem (#4025)
Provides the user the capability to communicate with other compatible
units/systems over existing telephone lines. It uses modulation methods and
frequency tolerances equivalent to either Bell 212A (1,200 baud) in high-speed
mode or Bell 103A (300 baud) in low-speed mode. It is offered as a complete
assembly consisting of two cards connected by a cable. The entire assembly is
installed in the system unit.
Internal Modem Port Board Racal Vadic.,
FCC ID ANO96M4025
J3 Modem port
J4 Dummy port
M1 ZP 94008-022
M2 NS INS82C50AV
|
M3 Motorola 4N35Q8647
P1 30-pin header to sysboard
P2 20-pin header to Modem Board
|
IBM 5140 AP Internal Modem Connector Pinout
| Pin | Signal Name | Dir | |
Pin | Signal Name | Dir |
|---|
| 01 | Address/Data Bit 0 | I/O |
16 | Address Latch Enable | I |
| 02 | Address/Data Bit 1 | I/O |
17 | Ground | – |
| 03 | Address/Data Bit 2 | I/O |
18 | Address Enable | I |
| 04 | Address/Data Bit 3 | I/O |
19 | Ground | – |
| 05 | Address/Data Bit 4 | I/O |
20 | +12 VDC | – |
| 06 | Address/Data Bit 5 | I/O |
21 | Ground | – |
| 07 | Address/Data Bit 6 | I/O |
22 | Ground | – |
| 08 | Address/Data Bit 7 | I/O |
23 | Ground | – |
| 09 | Address Bit 8 | I |
24 | Ground | – |
| 10 | Address Bit 9 | I |
25 | -13 VDC | – |
| 11 | Interrupt Request 4 | O |
26 | Ground | – |
| 12 | -I/O Read | I |
27 | -I/O Write | I |
| 13 | Reset | I |
28 | +5 VDC | – |
| 14 | -Data Enable | I |
29 | Ground | – |
| 15 | Ground | – |
30 | High Z | I |
Internal Modem Board
J1 4-pin header, pins snipped
J2 20-pin header to Modem port
M2 M83C154-29
M4 ZP 9410-015
|
M8 ZP 2120CP
Y1 11.0592 MHz xtal
Y2 4.0320 MHz xtal
Y3 3.579545 MHz xtal
|
The main modem board slides into place on top of the battery pack's
enclosure.
Speech Adapter (#4040)
186-166 IBM PC CONVERTIBLE SPEECH ADAPTER
The speech adapter is functionally equivalent to the IBM PCjr Speech
Adapter.
- CMOS ROM has 196 stored vocabulary words
- Supports two types of speech reproduction:
- CVSD (Continuously Variable Slope Delta modulation)
- LPC (Linear Predictive Coding)
- Microphone interface
- Audio output
Opening the 5140
From Don Hills:
Open the battery compartment door and remove the battery. This is
important, as many parts of the machine such as the memory chips are
permanently powered so long as the battery is charged. The battery catch is on
the bottom of the plug (like a modular phone plug).
Open the display by pressing the two small grey buttons under the carrying
handle at the front right and left corners of the case. If you don't use the
catches, you might snap off one of the small retaining catches on the LCD
screen bezel. Pivot the display backwards until it is just past vertical. Press
on the front bottom (notice the neat-o vertical serrations?) of the plastic
plate covering the front of the display's "neck" until the plate pivots away
from the neck, then lift the display up (wiggle it slightly side-to-side). This
feature is why it's called the "Convertible".
Undo the 4 screws on the rear of the case. Lift and remove the rear (non
pivoting) part of the top cover.
Pull the grey carrying handle forward, exposing 2 small slots in the case.
Use a small screwdriver or coin to press inside the slots while lifting up on
the front of the keyboard. Be careful not to damage the foil cable. Don't try
unplugging it yet, just move it forwards and lay it on the extended handle.
Note that the keyboard pivots on two small hinges at the front of the lower
case.
Undo the 4 screws holding the diskette drives in and pull the drives out.
Thumb in the diskette slot, fingers underneath is the best grip. Note that the
floppy drive bezels have catches that fasten them to the drives. They are not
loose!
Reach in through the diskette drive bays with one hand and through the
opening at the rear with the other, and unclip the diskette drive plugs from
the clips on the underside of the (pivoting) top cover.
Lift the rear of the pivoting top cover and slide it forwards until the
pivot pin at the front disengages from the slot it slides in and lift the cover
up and away, unplugging the foil cable to the LCD socket as you do so.
You can now unplug the keyboard cable.
Reassembly is the reverse of the above, just 3 tricks:
When screwing the diskette drives back in place, BE EXTREMELY GENTLE. The
screws must not be tightened too much- you will crack the drive front plates
and/or break the plastic pillars that the screws go into.
They are very fragile!
(Ed. They were cracked on mine)
From Us, the god-Emperor of Microchannel:
I found that getting the LCD unit back on was interesting. Note
that the LCD swings on a "trapeeze" that has a metal pin going through it. Note
the two pillars that come up on each side of the floppy and LCD headers. Notice
the arc made by the top of those pillars. See the groove? Notice that the open
end is toward the front.
What I did- lower the LCD neck to about halfway forward. This lowers the
cross-pin. Looking from the back, directly over the battery well, you can see
the shaft AND the grooves. Now you can actually SEE how to position the top so
the shaft will slide into the grooves.
Back to Don:
When replacing the keyboard in its well, make sure the edge
nearest the diskette drives sits on (not under) the small ledges moulded in the
front plates of the diskette drives. These ledges lift the keyboard to typing
position when the case is opened. If you get it wrong you may break things when
you try to close the case. The front corners of the keyboard have little pivots
that mate with the front of the bottom case. I had to push down
lightly to make them "snap" in place.
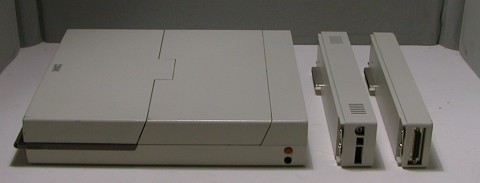
As for piggyback accessories, there were several. They were known as
"slices", because they were the same profile as the back of the machine and
when clipped on looked like an extension of the machine.
A few additions to your page:
There was no way of powering the system off completely without
removing the battery. Some parts of the system, including the memory and much
of the planar, were continuously powered. Being static CMOS logic, they
consumed negligible power when not being clocked. The battery would hold the
memory (and run the clock, there was no separate clock battery) for a couple of
weeks. There was no suitable CMOS diskette controller chip so it used a
standard NEC 765. This was power hungry so was actually powered off when not in
use- the BIOS saved and loaded the controller's state between drive accesses.
I've got a lot more somewhere, including info gleaned from conversations with
the actual developers, and the full IBM Tech Ref and Hardware Maintenance
Manuals.
Carrying Cases
Two soft-sided carrying cases are offered for the IBM PC Convertible. The
standard model (#4090) will accommodate the system unit, system-attached
printer, various accessories, and supplies. The system unit and printer can be
operated from within the case. The compact model (#4095) may be carried by
hand, worn over the shoulder, or carried backpack style. This model holds the
system unit in the main compartment and has an expandable pocket where the
printer, accessories, and paper or a notebook may be stored.
| 